52 263 Head Remove/Reinstall

Thanks to a rotted-out freeze plug, I have the "opportunity" to yank the head off my I8. (Darn the luck). Have ordered a FelPro gasket kit. Starting to work through all the steps in my head.

It's not all a wasted effort. I have a few lifters that could use inspection. One was initially reluctant to pump up. Two of them rotate very lazily. One has seemingly taken a "set" and doesn't want to spin at all - with the engine running you manually spin that pushrod a quarter-turn, and can then watch that pushrod somewhat deliberately return to its previous position. Is that pushrod bent? Lifter worn concave? Guide hole and lifter varnished so that's the way it "wants" to sit? Unsure. I'm suspicious of option #1. Will be able to see what's what once the rockers are off. And I'll have the opportunity to at least "clean" or "flush" the lifters - need to see what the best approach would be. I don't necessarily want to disassemble any lifters, but that's not off the table, either, depending on how they look/behave.

My initial thought was: Just pull the head. Leave the (delicate, probably horribly rusted and siezed) manifolds attached. Best not to touch anything I don't NEED to touch, that can start a slippery slope. Replace the freeze plug in the head, replace all 4 block freeze plugs, reinstall the head, the end.

But of course, once the head's off, there are more "opportunities".

Pull valve springs, inspect, lap the valves into the seats. Inspect guides & valvestems. (I don't have a reamer so I *really* hope the guides are all good!) That PROBABLY makes sense.

I'm pretty sure my heat riser is stuck open ("full heat"), might be able to do more from the *inside* than from the outside. Been juicing and tapping for weeks, it's still seized hard. Being able to manipulate it from the inside could help. So MAYBE that's something I should tackle with the unit on the bench. If nothing else, applying a little "blue wrench" (torch) from the inside as well as the outside couldn't hurt.

Then there's the stuff that scares me. If I pulled the manifolds I could have the head mating surfaces trued. I have one manifold stud (frontmost) that's snapped off inside the head, could get that addressed. All of that "could" make things better. Alternatively, all of that "could" end up breaking what is currently a perfectly good manifold. I don't believe I NOW have any head sealing issues - I will of course apply a straightedge and inspect judiciously - so I'm currently of the opinion of "if it's not broken now, don't break it trying to fix it."

Looking for opinions/validation/guidance based on your guys' experience. Am I being penny wise and pound foolish? I don't want to do damage to things unnecessarily - but I also don't want to pull the head again after discovering that the new gasket doesn't seal and have to go through all this pain ANYWAY.
 
And question #2:

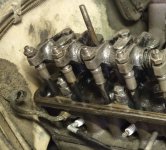
It looks like you must re-torque the head after a heat cycle (might even be MORE important to do that if using a FelPro gasket instead of the stock "lacquered steel" unit!), and since half the head bolts are hidden under the rocker shaft, the manual calls out a special tool to do so.

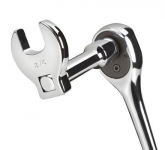
Would like any opinions - can you hit these bolts using a crowsfoot, or is there not enough clearance for that sort of wrench? You run your torque wrench at 90 degrees to the "foot" and it's within a few percent of actual torque - probably within the tolerances of your wrench, to be honest. But that only works if it can fit, and these sorts of sockets are pretty chonky. So I'm wondering if this is even an option.
1718373305662.png

I do know there are offset box-end crowsfoot sockets as well - I would ASSUME those would fit better, they aren't as thick - but I'm dubious about getting "65-70 lb-ft" out of something skinny with an open end.

And finally, tracking down an actual 3/4" cylinder head torque tool isn't unreasonable. That's the way I'm leaning IF it's consensus that a crowsfoot is too bulky to fit.

Are there any other options? I mean, besides "pull the rocker shaft off again"...that's what I'm hoping to avoid.
 
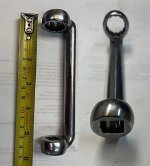
I have a Proto 6425 torque adapter, didn't realize it was so rare! The easiest ones to use keep the adapter directly over the wrench socket as in the Proto shown below.

Check availability on Ebay, CLICK HERE!

Torque Adapter-Proto-6425.jpg

I have seen them in different offsets, but I am happy with this one. You could build one easily. The shank is a heavier than a standard wrench.
Bluepoint offer one, S-9825-A
Snap-on, S9513C
Snyder's has one click here.
 
I may be misunderstanding something. If so, ignore. If your engine now has a metal head gasket and it is replaced with a composite one the engine WILL lose some compression.

Ben
 
Yah, I'll lose a tenth or two, still will have higher compression than a synchromesh engine tho. Nothing I'm going to get too worked up about. Looking for reliable/running, not building a bracket racer!
 
The '52 Shop Manuel recommends not using a gasket between head and exhaust manifold. The manuel recommends a mixture of graphite and 90 wt gear oil. After I tried that I did not get anymore cracked manifolds or leaking gaskets.
 
Another thing to check when reassembling the rocker arm shaft is at the rear rocker arm support, one of the bolts is inline with the temperature gauge sender. It requires a shorter bolt than the other side. It becomes an expensive mistake. (Voice of experience.)
 
One short bolt? That's good info. Noted. That's worth some markup with a paint pen or scribe.

And manifold gaskets: I hope to avoid removing the manifolds if at all possible, so I hopefully won't need to worry about that. But if I do, I'll probably avoid using the FelPro gaskets just out of an abundance of caution based on what I've read. I've seen this "no gasket" approach promoted when the heads and manifolds are pristine and true. I've also seen folks claiming (on heads with more "questionable" surfaces) that Remflex gaskets - which are constructed of "100% flexible graphite", whatever that means! - are a better bet than the FelPro style. Crush less, more even, seal better, etc. But regardless, if everything goes to plan, that'll be a moot point.
 
Rem Flex get my vote. From Summit Racing.
As well as being "unflat" the exhaust manifold can, and does, warp, . One or both ends creep skyward.

Ben
 
Finally was able to get a FelPro gasket set in my hands without it being folded in half. (y)

To clear up one of my previous misconceptions - I see that this FelPro kit (Part # FS7546SH) uses a sheet steel head gasket, and seems to measure about .020" thick. So not a composite gasket, and at least in the neighborhood of stock (.015" was supposedly stock for the 263 Dynaflows). So I doubt I'll lose any discernible performance *at all*. Assuming I don't screw it up in the process!

So now, I guess I need to start actually turning wrenches. Ugh. Now it's getting real. NOT excited. But it has to be done.


All right, another question - FelPro says to coat metal head gasket faces with "sealer" before install. This is the first thing I thought of. Anyone have any better ideas?

Permatex® Copper Spray-A-Gasket® High-Temp Sealant, 12 OZ - Permatex
 
The suggestion is to use sealer because usually around the water jackets corrosion occurs. But the sealer is not primary for sealing specially not compression, the gasket does this part. I believe the sealer is for adding a small layer of sealant assuming the surfaces are pitted, scratched, warped and other defects.
You ultimately want a clean uncorroded surface. If you have minimal surface defect you could wet block sand, and check with straight edge keeping contamination to a minimum. If you have a cast iron block, consider brushing corroded surface with Phosphoric acid(Naval jelly) wait a bit and with a wire brush clean the rust. Repeat the procedure until you have it clean, and last step use no wire brush and let the Naval Jelly etch the metal. The secret to getting the rust out is to let the Phosphoric do all the work. If the rust is bad, extend it several hours it will eventually get it all out. If the jelly dries just re-brush in some more and it will freshen it up. Clean and neutralize acid with wet rag of distilled water. Thereafter you could use copper spray or "right stuff"(Permatex) around the water jackets.

Of your concern of the head gasket thickness, do you know if the engine has been decked before? If so, you can take that into account against the thickness of the head gasket. Also, if you have carbon build up in the heads or cylinders that would increase compression and chamber temperatures. Probably want to clean that carbon out.
 
I know precious little about the history of this engine. I can tell the manifolds have been off of it - there's mismatched hardware, one of the bolts from the exhaust manifold to the carb heat riser (whatever Buick calls that flippy valve thingy) has been replaced with a stud and a square nut (!!), the frontmost exhaust manifold stud had been snapped off & I haven't been able to get it extracted yet, no-way, no-how...But no idea if anything has been done internally.

I'm planning on doing a thorough clean-and-inspect. Hopefully there are no surprises, but...
 
To remove a broken stud if it has some stem there is a tool that goes over it and as you turn to loosen it digs into it and then you can spin it loose. If that doesn't go well, you can file it parallel to surface, punch center, and drill a hole smaller than clearing the threads it went into it. You use one of the tools (there is a square and round one with curved splines) that goes in the center to loosen it up. Then, if that doesn't work you can go one drill bit size more being short of touching the threads, and once you get close, start picking out the threads to expose the threads. Than you can use a tap or thread chaser to clean out the threads. As alternate you can go common with HELICOIL if things don't go as planned. You can double HELICOIL if you know how to do it, but repair calls for a single one which is easier. There is uncommon option it is a thread Sert, may be more advanced level than the HELICOIL.

One thing is for sure it is time consuming; you have to make sure you go in straight and if you don't be able to correct it. Just some hints, you can tap lightly on the stud with a punch, you are trying to get the bond in between to weaken being mindful that you do not want to nick the head or mushroom the stud. If you have any doubts in your abilities consult an experienced and knowledgeable machine shop. They have the machinery that takes out human error and proven methods to fix. If they can't just look for another machinist.
 
That "broken" bolt on the front of the manifold may be , in fact, just a short guide stud. Some years are that way, others not. same for the very back one.

Ben
 
Have the broken stud removed while you have the head off. A machine shop will be able to do it, easily if it extends above flush. To do it successfully, you need at least an electric welder, you may want an oxy/acetylene torch, and some experience helps a lot. If you take it to someone experienced, you will almost certainly salvage the threads.
For squaring thread repair drills and taps, if you have a friend with a lathe, take a couple of pieces of scrap shafting, square them up and drill them to guide the drill and the tap. Hold them against the machined surface while performing the drilling and tapping.
 
Back
Top