"Buick Trademark(s) used with the written permission of General Motors"
 
 
Home Forums Garage Classifieds Reference

Buick Straight Eight Oil Supply Update


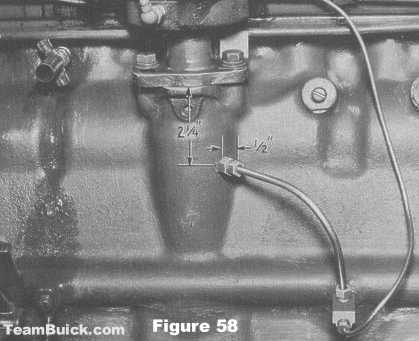
A production change has been made in 1946 engines to provide an increased supply of oil to the distributor gear. An external oil pipe is provided which delivers oil from the oil gallery directly to the distributor gear. See Figure 58.

Figure 58

PRODUCTION CHANGE ENGINE NUMBERS

The oil pipe went into production on 70 series engine No. 46511567, therefore, it will be necessary to install the pipe, in the field, on all engines below that number.

This campaign does not apply to replacement engines except in cases where a camshaft and distributor gear failure has occurred.

PARTS REQUIRED

50 Series package, Group 2.375, Part 1393516 - Distributor Oil Pipe Assembly - Dealer net $.24.

70 Series package, Group 2.375, Part 1393516 - Distributor Oil Pipe Assembly - Dealer Net $.24.

PARTS DISTRIBUTION AND AFA HANDLING

Parts will be supplied to dealers by Zones and Distributors at dealer net price and AFA's will be accepted for the material at the net price and for one (1) hour of labor at 50% of the Dealers authorized hourly flat rate. The original restricted oil gauge line fitting Part #135628 must be returned to the zone office for each job AFA'd.

INSTALLATION

  1. Crack engine until it is on the advance timing mark of #1 cylinder. This is done to facilitate replacing the distributor. Disconnect battery ground strap.
  2. Remove distributor for inspection of gear and to prevent damage while drilling. Disconnect oil gauge line at engine.
  3. Insert a rag in the bore of the distributor for the purpose of catching drill chips. Insert it to a sufficient depth to insure catching chips in a manner to permit its removal later.
  4. Lay out location of hole to be drilled exactly 2 1/4" down from distributor mounting ledge and approximately 1/2" out from flat side of the case on the forward side of distributor housing portion of the cylinder crankcase. Prick punch the point to be drilled. Se Figure 58.
  5. Drill a 1/8" pilot hole and then follow with a 11/32" drill. Align drills to be square with surface being drilled in both vertical and horizontal planes. A 1/4" electric drill is recommended for drilling holes because the space is limited. The drills used should be shortened and the 11/32" drill should be reduced in diameter at the shank. Se Figure 59 and Figure 60.
Figure 59
Figure 60

NOTE: If facilities are available the drills, as well as the tap used in the next step, should be magnetized to attract and remove the chips.

  1. Tap hole with 1/8" pipe tap. Use grease in channels of tap to collect chips. Blow out any remaining chips from the tapped hole.
  2. Remove the rag carefully to prevent any remaining chips from falling into lower crankcase.
  3. Remove oil gauge line restricted fitting, Part #135628 from side of engine and install in its place the double fitting with side opening up. Use a non-setting sealer such as Aviation Permatex on threads.
  4. Install special straight nipple in the new hole in crankcase again using a non-setting sealer on the threads. Connect the pipe to this nipple and to the opening pointing up at double fitting. It may be necessary to bend pipe slightly to bring nuts in alignment. Tighten both joints firmly.
  5. Re-install oil gauge line to end of double fitting. Tape this pipe to distributor automatic advance pipe.
  6. Inspect distributor gear for wear (See inspection of gears).
  7. Re-install distributor and retime ignition with timing light. Engine to be idling at 350 RPM.
  8. While engine is running check all connections for leaks, re-adjust idle speed to approximately 450 RPM.

INSPECTION OF GEARS

At the time the oil line is being installed to the distributor, the condition of the distributor gear and camshaft gear should be determined, and accordingly, should be continued in use or replaced.

The accompanying illustration, Figure 41, shows wear patterns on distributor gears in different stages of wear. The short and narrow tooth contact pattern is the best. As wear develops, the pattern broadens and lengthens but, the gear is still serviceable unless excessive wear shows feather edging or ridging of the teeth. Regardless of mileage, when the contact extends the full length of the distributor gear teeth, the gear should be replaced.

Figure 61

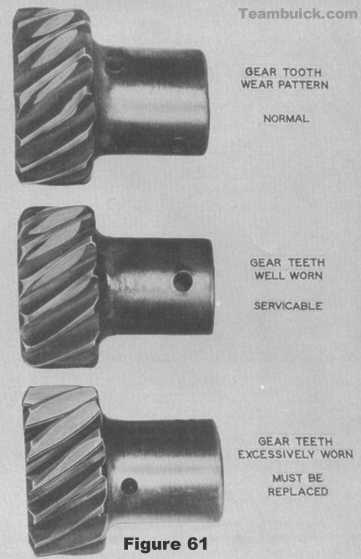
If the wear is excessive and the tooth has started to thin up (note ridge at the bottom of the tooth), wear is progressively worse under this condition and total failure is likely. In such cases both distributor gear and camshaft should be replaced.

contributed by: Clifford Herold (Straight Eight)