52 Special - Let's try to resurrect a survivor

Back from vacation - couple days in Carlsbad NM, couple in Santa Fe, trip home via Taos and Red River. Nice time!

Today - Spent a couple hours flushing the block. Got quite a bit of loose stuff out of the rearmost freeze plug hole, blasting water both forwards and backwards thru the pump connections, and boosting it with compressed air thru the pump inlet & block drain. Prodded around rear cylinders with a wire and a cable, ran the cable forward along the drivers side of the engine, and ran it quite a ways back into the head. Guessing it dumped around a half-cup of chunks/flakes. And there was a whole bunch of red water initially. Definitely going to use Tom's nylon stocking filter trick for the first few runs!

When done, I ran the borescope into the head. Little bit of light scale, nothing alarming. Basically, you could tell that it's old. And poking into the rearmost freeze plug port - can get a good look between #7 and #8, and can see fore and aft along the driver's side. Again - light scale, nothing looks ugly to me. I'd say it should cool. "Should."

OK, so now I have to decide what to do next. My next door neighbor (he's a GM guy ;)) handed me a big bottle of "Permatex Heavy-Duty Radiator Cleaner" and said if it were him, he'd run that through the block. It's the "mean" stuff, contains hydrochloric acid, and says right on the bottle that it shouldn't be used on aluminum blocks or radiators. Well, guess what my new crappy radiator is made out of...

I'm 90% convinced that for now I should bypass the chemical flush and just see how it runs / how it cools. I still haven't proved that there aren't mechanical problems in the block (e.g. blown head gasket, cracked head, whatever). It doesn't ACT like that's the case. There's no milkshake in the oil, no steam pumping out the tailpipe. I'm guessing/hoping that the engine got hot/started to boil because of a cruddy/plugged radiator and circulation issues as documented above. If I can prove in the cooling system - if it doesn't boil just idling in the garage - I think that would take a load off of my mind.

So, I think next I'll swap the heater hoses, and blow out the heater cores and transmission cooler. Hopefully those clean up OK too. And if they do, I'll put the cooling system back together and run her again.

And a bonus discovery. Reminder - I'd added fluid to the (completely dry) master cylinder and pumped it a bazillion times, eventually got some pedal. Well, today I still had pedal - and also today found that one or more of my brakes has hung up. Couldn't tell which it was. Could be a shoe that's come un-stuck. Or a collapsed brake hose - lets pressure in, doesn't let it out. Or just good old-fashioned crudded up brake cylinder. Made rolling it around darned near impossible. So, IF the car cools, brakes are definitely next.

Still need to figure out:

Size of the little 1 1/2" long hose/connector between the water neck and pump - 3/4" seems to fit, but it's pretty tight. It's what I'm running with for now since I have some. Looks like 1" would be WAY too big. And I don't have any 7/8" which MIGHT be closer. So - what size IS that little chunk of hose supposed to be?

Should I run a 180 degree thermostat? I accidentally bought a 160 degree. (Reminder to self, you can search for a 180 degree thermostat on Amazon, doesn't mean that Amazon will show you 180 degree thermostats!) Good enough to start with, I guess, since it's what I have, but I figure if the car cools, a 180 is what I want. Is that correct?
 
Last edited:
Not a lot of visible progress to share. Have spent several sessions knocking pounds and pounds of accumulated grease and road dirt off of the front brakes, suspension parts, etc. So that I can start hosing down the brake fittings, bleeders, cylinder bolts, etc. with penetrating oil. So that I can *find* the grease zerks. That sort of thing.

I'm a farm-boy, and I'm well acquainted with greasing old equipment that has no functioning seals. You pump in new grease until new grease starts coming out...that gets rid of all of the contaminated grease in whatever shaft/pivot/joint you're lubricating, keeps it from grinding itself to death. Something that's arguably "worn out" can continue to work for YEARS that way, as long as you keep fresh lube moving thru.

Evidently this car's previous owner thought that way, too. They greased the HECK out of the front end.

What they DIDN'T do was the 2nd step in that process - and now you REMOVE all of the junk grease you displaced. They evidently just left it there. There was over an inch of accumulated grease around the kingpins. You couldn't see any metal...and I mean that literally...on the inside of the brake backing plate. It was a solid mass. Not a single zerk was accessible, they were all buried up to their tips (at best) in gunk. Some weren't even visible - completely covered. Never seen the like.
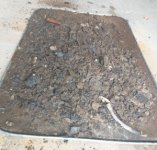
Chipping_away_accumulated_grease.jpg
This has been taking entirely too long. This nasty stuff is decades old now, and has understandably set up like asphalt. The picture shows between 10 and 15 lbs of gunk, and that's not the first nor the last tray. I haven't even done the passenger-side suspension yet.

I'd like to pressure wash a lot of that away, but (as described) there aren't any seals. So a pressure washer would end up injecting water into every joint in the car. I suppose the only safe thing to do is to use some sort of chemical degreaser, e.g. Simple Green, and low pressure water to wash it away...probably have to hit everything with a brush. Save the pressure washer for things that don't move. And re-lube when done regardless. I'll put that in the "when I have time" bucket.

Lastly, found out that one of my front wheels has an add-on piston-style shock that's been crudely bolted on. Which probably means the OEM shock is completely knackered. Going to need to review what's going on there. A working add-on shock is probably good enough, but the aesthetics of the addition offends me. ;)
 
Last edited:
Good progress.

Got all of the cooling system put together and was able to run the engine again. Will start by saying that lots of *very* good things happened. That being said, there is one concern, and one unfortunate discovery, more on that at the end.

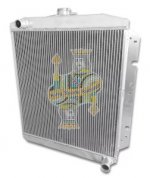
1) The car cools well with the new eBay "King Spade" Aluminum radiator. Admittedly, I will acknowledge that this radiator is NOT an exact fit. Probably no way to get that info back to the manufacturer, unfortunately, but it is what it is. The radiator is built with the mounting flanges even with the edge of the CORE, not the edge of the TANKS, so the bottom tank crashes on the rad support mount. I spaced the rad further back by replacing the mounting bolts with longer bolts, and running an extra nut between the rad and the radiator support. This moved the rad back far enough for the bottom tank to JUST clear-which is good enough. And there's still plenty of room before the fan bites anything.

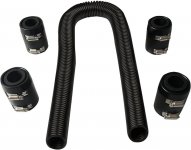
Also, the bottom rad outlet is via a straight (as opposed to an upswept) connection, meaning that the stock hose won't fit. I have temporarily/semi-permanently deployed an el-cheapo "universal" radiator hose kit that so far has done the job. It's a silly design - a corrugated stainless (?) tube, and neoprene connector sleeve which is squeezed down with dual hose clamps under a cheesy beauty cover. Hey, it seals, and it seems to work.
radhose.jpgking_spade_rad.jpg
Caveat Emptor. But it seems to do the trick for now.

2) No blown head gaskets/cracked heads/cracked block detected. Big sigh of relief. In total I ran over a gallon of gas thru the car (still using the 12V clicky-clack pulling from a jug), getting multiple heat cycles on the engine. Didn't blow compression wind through the cooling system / no milkshake / no misbehavior.

3) Checked ancillary systems while idling. Ammeter works. Generator charged, settled in at 6.8v after catching back up from start. Oil pressure stayed on upper part of range. Temp stayed midrange. Brake lights work. Headlights and tail lights work. Turn signals work. Heater control allows circulation (Note: Need to test NOT allowing circulation...). Neither heater nor defrost core seem to leak. Don't see any indication of trans fluid mixing with coolant (phew!). Heater fan blows. Defrost fan works. Horns work. Cigarette lighter works! Wipers work!! Only known-brokes in ancillary systems now are the radio (not surprised), and clock (really not surprised).

4) Had one lifter that just wouldn't pump up. "Clack-clack-clack". Pulled the valve cover, observed the intake of #8 being really lazy..not lifting anywhere near completely. Just as a Hail Mary, adjusted the pushrod down a bit to entice it to start exercising the lifter again, and (surprisingly) it moved a bit, then pumped right up. I was then able to pull the additional preload OUT of the rocker and it settled down and was quiet. So, probably varnish (my guess is that #8 intake was wide open for a decade or more, long enough for the lifter to stick). Will keep an "ear" on it.

5) Resolved all known vacuum leaks. Engine started idling *good*. For grins, managed to get video of a nickle balanced on edge on the valve cover. Balancing_Act

6) Transmission in drive, and with my one dragging, grabby brake...it will move reluctantly in Drive. OK, used Low. Pulled the car to the end of the driveway, then reversed back up into the garage. She's a roller. DEFINITELY brakes is next on the list.

Now for the unfortunate discoveries:

1) Besides the one collapsed lifter, there were 3 pushrods that weren't rotating. I don't mind "lazy" rotation - they don't need to rotate at 300 RPM like some of 'em seem to do - but they DO need to rotate. I was able to squirt a little ATF on top of the lifters and kept spinning the pushrods, and eventually 2 of the 3 started to turn on their own. They don't turn FAST, but they do turn, and that's good enough for me for now. The 3rd seems to have taken a "set"...you can spin it a quarter-turn, and it seems to move right back into the same place on its own. This could be many different things, from a bent pushrod to a concave lifter (which probably means that cam lobe is wiped, unfortunately, but it seems to lift well so "dunno"), to just some varnish that keeps the thing from turning. Will see how lucky I am when I have the opportunity to dig into it.

And I will have the opportunity to see, because:

2) Remember when I said that the back-of-the-head freeze plug looked like it was hanging in there? :cry:

So like it or not, at some point soon the head has to come off. Right now it's just a very slow drip even under pressure, but you know that won't last.

I'm going to be looking for suggestions, advice - heck, condolences. I'll probably start a thread in "Straight Eights!" on tips/tricks for removal/replacement of the head. Next door neighbor/car guy also says "as long as it's off, good time to get the head serviced - true up the mating surfaces, it's not that expensive". I say "I don't want to touch the manifolds if I don't have to, and if I run a compression check now and get good numbers, I feel the same way about the valves". I suppose if I *don't* get good compression numbers my answer would be different, but I'm really reluctant to do more violence than I need to. (Reluctant enough that I haven't even tried to run a compression check, what you don't know can't hurt you...)

When the head comes off, I can inspect the valvetrain, make sure all pushrods are straight, inspect that lifter (assuming I can get it out!), see what I'm getting into. Hopefully it's just varnish, or MAYBE a tweaked pushrod. Heck, I don't know, if the cam and lifter have "taken a set" and started to wear in, would dropping in a new lifter be worth considering? Wouldn't make things any worse, right?

And hey, I'll get the opportunity to make sure the carb heat is where I think it should be. And I'll have much easier access to pound in the 4 freeze plugs on the side of the engine. So it's not a total bummer - just a "mostly bummer".

But all in all, I'm going to say - with these 2 exceptions, I'm pretty happy with the way things turned out. Lots of very good things happened. And the not-so-good things weren't catastrophic. Yet. Until I break a manifold. But we won't EVEN go there.
 
Last edited:
Have been making slow progress. A couple of setbacks, nothing that is horrible.

Ordered a gasket set. Found it online. Chose NAPA - decent price, they're nearby, etc. Except this is now an "online-only" order, and they ship to me instead of the store. Oh, well, free shipping, sure. Well, the box arrived via UPS bent into a "V" shape. Immediately called the seller, and thus starts the annoyances. No, they won't let me return/order a replacement through the local shop - this is "online only". OK, fine. And no, they won't just ship me another gasket set while they resolve the issue with the shipper. Ugh. And the shipper has to call me and talk to me before they will respond to the seller - been days now, no response. Double-ugh. And until the shipper responds to the seller, I can't get a return label. Argh! Maddening.

Next time I'm calling the local store directly.

So in the meantime I've been playing with brakes. Which is one of my favorite things...right. Taken several days just to get things apart. Multiple sessions with penetrating oil. VERY carefully breaking connections loose without twisting off the brake lines. Every connection I've separated did the "sure, I'll break loose from the brake cylinder, but I'll stay rusted to the line so if you twist the wrench more than 2 degrees the line will snap off" trick. Juice, juice, wiggle, juice, wiggle, wiggle, juice, juice, wiggle. HOURS of fun. But I got all of the cylinders loose. Last challenge will be the rear hose. It's visibly corroded

Early-on, I decided I'd just replace the brake cylinders, they're cheap enough that the incremental cost from a rebuild kit isn't warranted. That way I get new bleeders and everything. No problems so far. Rears came right apart and practically fell back together. Gearing up on the fronts next - mentally preparing for hardened/torn up wheel seals, that sort of thing, but that's OK, will get through it.

The master cylinder, though - not so cheap, so I took a flier and ordered a rebuild kit on that. Spent a bunch of time yesterday evening pulling the master (on that one the front line actually came right off!), cleanup, disassembly, etc.

Unfortunately discovered that the bore is eroded. In an attempt to try to save it, I honed it more than I probably should've - and still, it's not acceptable. There was obviously quite a bit of water settled in the bottom over the years. Several areas are really rough, and right where the piston will travel. Darn!

Would it "work" even if it might seep a little? Maybe. Do I trust it? Absolutely not!

So, I'm going to go the "reproduction" route and have a replacement drop-shipped. Thought briefly of having my stock cylinder sleeved - that's not black magic *if* you can find a place that'll do it - but the cost of everything I've found is higher than the reproduction part. If this was an unobtanium part that would be viable, but reproductions are available and not HORRIBLY expensive. So "cheap enought but not original" looks like the way to go.

So, more "hurry up and wait".
 
Not a lot of excitement, but some steady progress. The old girl is telling me what she needs, one paycheck at a time.

Since my last update... Brakes gone through. 4 new wheel cylinders, 3 new hoses, 2 pints of DOT3, and 1 new master cylinder. Had a tussle with the new Wagner front shoes (link), have put those aside for now, running the originals. Pedal feels "ok". Admittedly it's been so long since I've driven a drum-drum system without a booster that I don't really remember what it should feel like. The pedal gets firm, it's not spongy, it may pump up a BIT with repeated jabs, it's on the bottom side of the throw but it's not scary low (and I realize after driving a bit I will need to readjust the brakes anyway).

Still looking for an auto parts store that I can order the gasket set directly from, wanting to avoid another UPS oops. Or if I do have to have it shipped, find someone who will double-box appropriately.

Installed a new gas tank. The original tank had been dented, somehow. And there were some suspicious stains, like maybe it was leaking. Plus, running the bore scope down the filler showed a LOT of rust/scale/debris. Plus, someone had given up on the sender and plumbed the pickup line directly into the tank drain (!!!!). So, yes, that also means I spent quite a bit of time blowing out the fuel lines with brake clean and compressed air. Did remember to run a dedicated ground for the sender.

Tried the mechanical fuel pump. When i last ran the engine I'd felt a pulse on the pump's intake hose so I thought MAYBE...but no. Multiple failures. Can't even suck through the pump, so I suspect one of the one-way valves is struck...guessing the output since I felt a pulse on input. Plus, I believe I saw fuel coming out of a breather- or weep-hole on the pump so...going to order a rebuild kit. Will continue to use the12v clicky-clack pump that came with the car in the interim.

So my list is now down to 3 major items...well, 4 if you count needing new tires. 1) Freeze plugs (waiting on gasket set). 2) Fuel pump, and 3) Seat belts. (Happy wife, happy life!).

Plus some ancillary stuff that isn't mandatory, but will happen sooner or later. I need a driver side rearview mirror to keep Johnny Law from taking offense. I need some sort of jack...the car came with a lug wrench, a spare tire that could be older than me, and nothing else. And I'll put together a bag-o-tools and start trying to figure out what an emergency parts bundle should look like. I haven't changed points, or plugs, or wires, or coil...it's all "just worked" so I haven't been in a hurry to add more variables. I'm sure the first time my plug wires get wet they'll start arcing to ground...that'll get me off dead-center. But until it happens, I'll pass the time planning.

So - I'm open for suggestions for a reasonable rearview mirror, and suggestions for a jack. If there is a really good pump repair video, feel free to forward it my way. And if you have any strong feelings about what a roadside repair kit should contain, I'd appreciate the insight.
 
Last edited:
A little bit of actual excitement this time. Drove her today! Well, rolled her around at 30-40 mph. Haven't changed tires yet, and she started to shake if you tried to run any higher. Got in about 7 miles total.

Ran the fuel pump off of a 12v drill battery, other than that, it was original 1952 stylin'. Brakes were fine-the more I used them the better they worked. Haven't done any panic stops, hope not to have to for a bit, but I feel pretty good about what I'm seeing. It steered ok, didn't pull, dart, or do anything untoward. It's not leaking horribly. Didn't get hot. Charged. Lifters were quiet. Oil pressure was good. Fuel sender seems to work, gas gauge responded. Even the speedometer "responded" (but it's wildly optimistic...47 indicated is 40 mph). Turn signals worked. Dynaflow did Dynaflow things. All in all, pretty happy.

Have ordered a fuel pump rebuild kit, that'll be the next bit of wrenching.

And I need to yank the wheels again to get real rubber under the car.

Checking - the date stamp on the tires is 3 digits (meaning "prior to 2000"), ending in 5. So, 1995 at the latest. At least 29 years old...whoa. What's the chance it's 85? Goodyear Invicta GS in 215/70R15.

And the spare has no date code, so it's older that 1971, right? BF Goodrich Silvertown 4 ply nylon 7.60-15 tubeless, showing 2 1/4" of whitewall outside of the rim. Not impossible that it's older than me. And it seems to have problems keeping wind on the inside. Not a very useful spare...sure is pretty tho.

All in all, she treated me pretty good today. I'll take it!
 
Last edited:
Heh, no wonder the speedo is so wildly optimistic. From my reading, the radial conversion for a 7.60-15 would be 225/75R15. So these tires (215/70R15) are quite a bit shorter than stock. Maybe not enough to true up the speedo completely, but it'll make a difference.

Lessee - From tiresize.com, they claim the 215/70R15 does 752 revolutions per mile, the 225/75R15 does 713. That's over a 5% difference, isn't it? That'd get my 47mph-is-40 down to something like 44-is-40, wouldn't it? Plus, it'd bring down cruising speed RPMs by a similar factor.

Sounds like my new rubber should be 225/75s. If anyone disagrees, let me know!

According to the conversion chart on the Coker site it looks like you are correct on the 225/75R/15. Could also use a 235/70R/15. But that is slightly shorter and wider.

 
I need to re-calibrate my concept of what "cheap tires" means in 2024. Geeze.

Have tires on order from a local independent tire store. MAYBE could have saved a few dollars going with a chain, but the one chain I called, talked to someone who couldn't help me, they said their manager would call back...never happened. Meanwhile, I'd sent an email to a local independent shop I'd used before, asking for an "out the door" price on 5 tires. No hassle, within an hour they'd emailed me 3 options, I picked one & emailed them back, they responded saying they'd let me know when the tires are in. No hassle, no funny business, no having to "make an appointment to get this price." THAT'S the way you do it.

Plus, on the chain websites I kept running into "to get this pricing you HAVE to order online. And we won't let you check out without entering a car. And our website doesn't go back to 1952." Phooey!

So. While I wait for rubber, have rebuilt the fuel pump. This is my first time doing one of these 2-way vacuum pumps, and wrapping my head around the linkage took some doing.

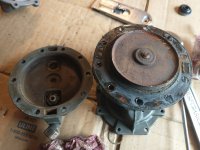
My suspicions were validated. While the vacuum side of the pump seemed to be 100%, the fuel side was completely knackered. There was a bunch of rust filling the bottom of the input screen (I mean a *bunch*, the bottom half of the screen was full, both inside and out!). The bottom of the pump was rusted, the valves on the bottom of the pump were corroded - and were a real joy to pry out, let me tell you! The input one-way valve was jammed open with corrosion and rust, the output one-way valve was jammed closed. And the diaphragm was rotten, cracked, and leaking. Took quite a bit of scraping/cleaning/polishing to get everything back to reasonable.

Man, I hope I got it all right. I followed the instructions, using longer screws to deal with the vacuum cover, staking what needed staked, doing the "flex before tightening" when assembling the fuel diaphragm, the "make a 3/32" flexing tool" for assembling the vacuum diaphragm...did it all. Correctly, I hope!

It did prime, pump up, didn't leak, and the car settled into an idle. So, that's encouraging. Once I get her back on the road, we'll see if it moves *enough* fuel. Then I can exhale.
 

Attachments

  • Fuel_Pump_Bottom.jpg
    Fuel_Pump_Bottom.jpg
    189.1 KB · Views: 6
  • Bad_Diaphragm.jpg
    Bad_Diaphragm.jpg
    235.5 KB · Views: 6
Welp, I think we can say that the "resurrection" part of this saga has been achieved. New tires mounted up, drove the car. Gave the neighbor lady a loop around the neighborhood. Grabbed the wife and did a little mix of highway and street driving. The car tracked well, no vibrations. Ran her up to 55mph without complaint

Checked the transmission fluid after the little multi-mile loop we'd run...needed to top it off.

Ran a couple of errands, the first being "buy some GM-compatible Transmission Fluid" :D (and thanks to GL03 for the timely research prompt - I was able to find some Dex/Merc that supposedly meets the Allison TES-389 specification, so that's what I topped her off with).

Did a brake check. It did well. BUT, the used engine oil (don't judge, it was all I had!) I'd thrown in the air cleaner sloshed over. So, while I can't find any of the 50-weight the manual calls for locally, my 2nd errand was buying some 40-weight at Autozone. Hopefully that stays put.

(The 40wt was "on closeout" at $5/qt. Gack, I just remembered buying 10W40 at K-Mart for $0.88/qt when I was driving an AMC in high school. Tires aren't the only thing that has gotten more expensive!)

The last errand was buying some beer to celebrate the win. That was very satisfying.

Now, while the "revival" may have been achieved, the car is far from done. I'm starting to make a list. It's still going to be "one paycheck at a time", that hasn't changed, but maybe we can enjoy her in between now. Unless something else rears its ugly head. Definitely need side mirrors. And seat belts. Going to try to take care of all of the "drips" that she's got going - freeze plugs, including the one on the firewall side of the head, the darned thermostat on the inside firewall, the darned torque ball (THAT one I'm not looking forward to messing with!). The list is long

But that's for another day. Right now I'm basking in the afterglow. A couple of months ago this car was sitting in a barn, engine lightly stuck, no one had tried to start her since the previous owner's father passed away 11 years ago, last time it moved under its own power was over 15 years ago, and it hadn't been on the road for well over 20. And now it's starting, running, and driving.

I'm a happy guy.
 
Last edited:
Even though I didn't WANT to, and hoped to never HAVE to, as a part of the head remove & reinstall needed for Freeze Plug replacement, I needed to address the exhaust manifold to heat riser (Buick manual calls it the "Valve Body" for the Exhaust Mainfold Valve) connection. It was leaking, and not getting any better. Top left (front) corner completely blown out. So started attempting removal. And it was worse than I expected.

I think the 3 bolts on top of the heat riser were all Grade 5, and all were in decent shape. All of them let go without complaint, just doing the standard "be really careful, don't force anything" approach.

However. Of the 3 bolts holding the heat riser to the face of the exhaust manifold:

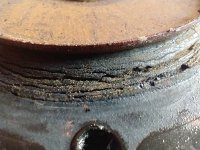
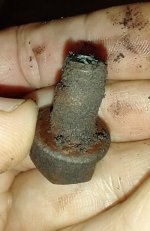
The top right was more like a Grade 0. I twisted it, felt it move, got several good pulls on it, it started to seize up. So I juiced it again, ran it in a bit, backed it out a few more good pulls. Started to get hard, so ran it in a bit, backed it out, and...it twisted right off. I definitely wasn't ham-handing it, it was just that soft.

Since it did move, I'm thinking/hoping it'll be simple enough to extract, and it feels like the threads are still usable, we'll see. Will be much easier once the head is on the bench.

Grade_0_Hardware.jpg

The bottom bolt is way undersized (a 7/16" head vs the expected 9/16"), and obviously is nutted inside of the heat riser. I need to work on this some more. Will be able to access from the bottom, I think. How else could they have tightened it? THAT is easy enough to replace with a stud if necessary.


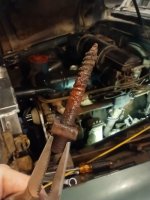
And the top left bolt surprised even me, and I thought I'd seen it all. Words fail...

farmer_stud_repair.jpg

That looks like something you'd find in an old barn!

Just hope there's enough meat left for a Helicoil to bite. I don't see any cracks or anything that makes me think it can't be salvaged. But like I said, this'll be a whole lot easier once it's on the bench and I can see what's going on.

Disassembly continues...hope that's the last of the rude surprises.
 
Last edited:
LOL! Can you say "shade tree" repairs? Yep, hope springs eternally, or something like that.
Well at least now you should be able to have the manifold surface of the head evened up as well as the head surface of the manifold.. And HOPE the manifold is not warped vertically.

Ben
 
Even though I didn't WANT to, and hoped to never HAVE to, as a part of the head remove & reinstall needed for Freeze Plug replacement, I needed to address the exhaust manifold to heat riser (Buick manual calls it the "Valve Body" for the Exhaust Mainfold Valve) connection. It was leaking, and not getting any better. Top left (front) corner completely blown out. So started attempting removal. And it was worse than I expected.

I think the 3 bolts on top of the heat riser were all Grade 5, and all were in decent shape. All of them let go without complaint, just doing the standard "be really careful, don't force anything" approach.

However. Of the 3 bolts holding the heat riser to the face of the manifold:

The top right was more like a Grade 0. I twisted it, felt it move, got several good pulls on it, it started to seize up. So I juiced it again, ran it in a bit, backed it out a few more good pulls. Started to get hard, so ran it in a bit, backed it out, and...it twisted right off. I definitely wasn't ham-handing it, it was just that soft.

Since it did move, I'm thinking/hoping it'll be simple enough to extract, and it feels like the threads are still usable, we'll see. Will be much easier once the head is on the bench.

View attachment 16226

The bottom bolt is way undersized (a 7/16" head vs the expected 9/16"), and obviously is nutted inside of the heat riser. I need to work on this some more. Will be able to access from the bottom, I think. How else could they have tightened it? THAT is easy enough to replace with a stud if necessary.


And the top left bolt surprised even me, and I thought I'd seen it all. Words fail...

View attachment 16227

That looks like something you'd find in an old barn!

Just hope there's enough meat left for a Helicoil to bite. I don't see any cracks or anything that makes me think it can't be salvaged. But like I said, this'll be a whole lot easier once it's on the bench and I can see what's going on.

Disassembly continues...hope that's the last of the rude surprises.
They were serious about "Crossed threads is better than no threads." I thought it was wrench humor.
Why don't you tap threads before you Helicoil? Put in a new bolt. Sometimes the bolts strip out when someone puts in too short of a bolt. Longer bolt if it grabs minimum three(prefer four) threads should work.
 
All options are on the table. Heck, I might even contemplate sliding in a metric bolt if one will squeeze into the valve body - why not, it literally cannot be any worse than that!

Seriously, though: Once the head is on the bench, I'll figure out next steps.

Barring more unexpected surprises, I am fairly confident that I should be able to extract the upper-right bolt, it did move. And if it does come out without a fight, that hole will probably clean up and work.

I am also somewhat confident that the lower hole could be repaired with a stud, even if it does need to be backed with a nut. That's "farmer", but it's farmer that I can get behind.

That upper-left? Yeah, I'm going to clean it out and try it, you bet. But I'm still trying to recover from the shock. And very dubious that it's in any kind of condition at all. That wood screw was fastening to "something", and it was a long one, so the threads are going to be mangled.

I need to look online and see if anyone has the spec for the OEM bolts. Assume they're Grade 5 like the top ones were, but what lengths? Doubt I'll be able to find anything. Maybe with one of the fancy parts manuals? Or I just measure the depth of the hole, and make sure I don't bottom out...

The torque spec is fairly benign - torque on valve-to-exhaust is only 25-30 ft/lb. Valve-to-intake is even less, 15-20 ft/lb. Not a lot. These things do move around, heat cycles & differential expansion, but if I can get it to take 25 ft/lb and *stay put*, that's all I need.

(I keep telling myself :p )
 
Last edited:
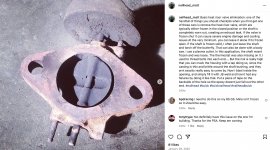
@bittmann Have you seen Matt Martin's article about removing the heat riser on the Centerville Auto Rapair site? He has some great articles on the site and I was just reading that one two days ago but now that specific article isn't loading for me. Here is the link. https://www.nailheadbuick.com/post/heat-riser-valve-removal

He says that if its stuck closed you can use a torch to burn out the valve flapper. If its loose the says to take it out completely and use JB weld in the side holes. You could try tapping them to put bolts in to block the holes but risk cracking it.

Here are screenshots from his Instagram post about it in case that link above isn't working still.

Screen Shot 2024-09-10 at 11.04.00 AM copy.jpgScreen Shot 2024-09-10 at 11.04.07 AM copy.jpgScreen Shot 2024-09-10 at 11.04.13 AM copy.jpg
 
Just MY opinion!!
I think you will do yourself a disservice if the heat riser is eliminated. I have a custom built intake manifold. It iced up until I INSTALLED a heat source.

Ben
 
Back
Top