58 Special resurrection adventure.

58Coupe

Member
Thought I’d start a thread to document my progress. If this isn’t allowed please let me know and I’ll delete.

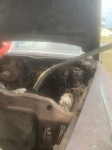
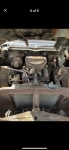
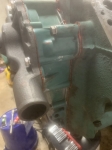
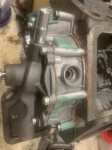
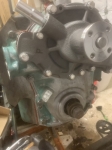
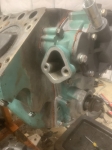
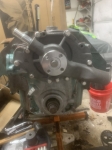
Picked up a 58 Special two door sedan. Motor is locked up. Bought a 59 LeSabre for the free spinning motor thinking I could simply swap the engines out, but turns out the block from the 59 is seriously cracked. But it has a free spinning rotating assembly.

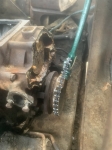
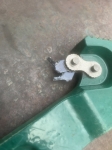
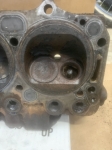
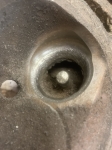
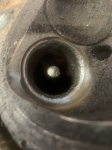
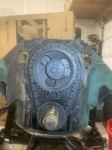
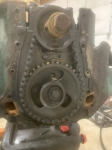
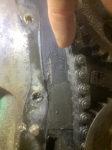
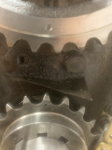
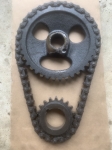
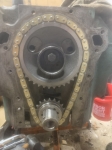
I’ve soaked the 58 in 50/50 ATF and acetone since July, and it is still stuck. Took the heads off and one of the valves was broken off. With the heads off I’ve soaked the cylinders for a week I Kroil. Been working on the crank pulley with a 24 inch chain wrench. Welp, today it bent the wrench, bent my piece of conduit I had laying around, and broke the chain but it still didn’t budge.

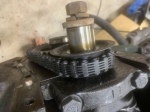
I think this engine must have a spun and seized bearing, or several stuck pistons. Was hoping to free it up to get it out of the car without the transmission, but it’s looking like I’ll have to take them both out together. With a HOA that’s already made me get rid of the 59, I’m skeptical I won’t get another letter. May have to sneak it into the back yard under the cover of darkness lol!!!
 

Attachments

  • IMG_6243.jpeg
    IMG_6243.jpeg
    309.3 KB · Views: 10
  • IMG_6242.jpeg
    IMG_6242.jpeg
    252 KB · Views: 10
  • IMG_6247.jpeg
    IMG_6247.jpeg
    136.3 KB · Views: 11
  • IMG_6245.jpeg
    IMG_6245.jpeg
    264 KB · Views: 10
The passenger side head of the 58 had a broken valve on cylinder number 2. Took a wire brush to it today to see exactly how bad it is. I thinks it’s not useable at this point, but I think the 59 heads will work. Need to disassemble, clean em up and check em out.
 

Attachments

  • IMG_6195.jpeg
    IMG_6195.jpeg
    261.3 KB · Views: 7
  • IMG_6249.jpeg
    IMG_6249.jpeg
    317.9 KB · Views: 7
  • IMG_6250.jpeg
    IMG_6250.jpeg
    286.3 KB · Views: 7
Acetone dissolves urethane and other types of paint. ATF can probably dissolve sludge, but I only see rust in your images. I would probably try something else for rust like rust catalyst, WD40, Evaporust, solution of naval jelly and distilled water, and or OXPHO.
 
Acetone dissolves urethane and other types of paint. ATF can probably dissolve sludge, but I only see rust in your images. I would probably try something else for rust like rust catalyst, WD40, Evaporust, solution of naval jelly and distilled water, and or OXPHO.
Thanks GL03. I have been soaking the top of the engine in KROIL for the last few weeks. About half of the cylinders leak it down. I'll try the evaporust too.

I really don't want to have to remove the engine and transmission together so I'll try to weld a plate with a nut welded to it onto the crank pulley and try to break it free. I mean if it wont break fee it wont and I'll remove the engine and transmission together, but I'd rather not have beat the pistons out on my garage floor if I don't have to.

Here's some pics of the engine with the heads off. I'm hoping I can get the engine apart and the block is usable. The heads from the 59 look good but I need to disassemble them.
 
I have turned my attention to getting the 59 engine with the cracked block operating. Did a lot of research on welding cast iron. Mostly learned that it might be successful, but most likely won’t be. I discovered cast iron metal stitching - something that’s been done for many many years. Bought a kit and stitched up the crack and I’m happy with how it turned out despite how ugly it looks. Gonna give this a shot and clean out the water passages real good, new gaskets, new timing chain, new freeze plugs (one was missing - hence the crack in the block), new water pump, and roll with it. Had about an inch of lead sludge in the oil pan I cleaned out. The heads look great, rotating assembly looks great, cylinders look great, rotates nicely. I have the transmission that it was mated to and marked where it was in relation to the flywheel so it should drop into the 58 when I get the locked up engine out.

As for the 58 engine, several times I’ve welded up a 3/4 inch nut to a plate and bolted it into the harmonic balancer and each time have either stripped the nut or broken the weld. That engine is good and stuck.

Now I have to figure out what is cooler - clearing over the patina’d engine and leaving the engine bay patina, or painting the engine to look new and painting the engine bay. The car body is 50/50 black paint and rust. Not sure what I’ll do there, but I’m leaning towards cleaning and painting the engine bay and painting the engine, while keeping the body rat rod patina.

Some pics:IMG_6370.jpegIMG_6374.jpeg
 

Attachments

  • IMG_6376.jpeg
    IMG_6376.jpeg
    579.4 KB · Views: 8
  • IMG_4600.jpg
    IMG_4600.jpg
    355.1 KB · Views: 7
After some sporadic attention I’ve got the iron stitching done to the point where it won’t leak with standing water in the block. I’m curious to figure out how it will react when the engine is heated up and cooled down. I’m not overly confident that the block won’t leak, but it shouldn’t. This method has been used for over a century to fix old boilers, so I guess if done right, it should be okay.

I’m now ready to put the 59 engine back together. Looking at the timing chain, I think it’s been replaced. There’s no nylon teeth and there were no remnants of broken nylon teeth in oil pan or the inch of lead sludge in the bottom of it. There is a fair amount of play in the chain from side to side - about 5/8’s of an inch…. Not sure if that horribly bad, regular bad, or normal and if I could just roll with it. Since I’m not 100% positive the block isn’t gonna leak, I’m inclined to roll with it to see if the block will hold up and change it later if I need to.

Then I need to yank the original locked up engine and transmission out of the 58 as a unit (which will be a pain) and put the 59 engine and transmission in.
 

Attachments

  • IMG_6436.jpeg
    IMG_6436.jpeg
    315.8 KB · Views: 3
  • IMG_6433.jpeg
    IMG_6433.jpeg
    278.6 KB · Views: 3
  • IMG_6434.jpeg
    IMG_6434.jpeg
    258.2 KB · Views: 3
Timing cover and oil pan cleaned and ready to install. I have a new 58 water pump to install but I need to get new water pump hardware. Bought the “best” gasket set to put it all together with. Replaced the front seal with new rubber seal. Once the new water pump hardware comes in I’ll put the timing cover on. Also got some “Buick green” spray paint. I’m interested to discover how closely it matches the original. I’m guessing it’ll be close, and close enough! Interesting, but I found what might be an original number stamped onto the oil pan under all the caked on oil and dirt.
 
Making slow progress. Got the timing cover cleaned up and installed the new timing chain. Made the mistake of lining up the wrong hole on the crankshaft sprocket and it was 2 degrees advanced. Wasn’t sure how that would affect the way the engine runs but research tells me that it’ll make the power band shift to provide more low end torque because the exhaust valves would open a bit earlier (?). Figured with all the low end torque these nailheads have already that it might affect the way it runs at higher speeds, so removed the timing set and put it back to zero…. I needed a 3 arm puller to add to my tool collection anyways. 😂

I then went ahead and got some gorilla snot as Matt and Russ call it, and installed the timing cover and new water pump with new stainless steel hardware. I decided I’m going to paint the entire block to look new and repaint the engine bay to look new.
 

Attachments

  • IMG_6861.jpeg
    IMG_6861.jpeg
    250.8 KB · Views: 6
  • IMG_6862.jpeg
    IMG_6862.jpeg
    291.6 KB · Views: 6
  • IMG_6859.jpeg
    IMG_6859.jpeg
    262.2 KB · Views: 5
  • IMG_6858.jpeg
    IMG_6858.jpeg
    250.9 KB · Views: 4
  • IMG_6857.jpeg
    IMG_6857.jpeg
    232.8 KB · Views: 6
  • IMG_6845.jpeg
    IMG_6845.jpeg
    306.7 KB · Views: 4
  • IMG_6853.jpeg
    IMG_6853.jpeg
    276.5 KB · Views: 6
  • IMG_6863.jpeg
    IMG_6863.jpeg
    264.6 KB · Views: 4
I was thinking that on the heads, if you have a seized valve broken inside of it, why don't you remove the valve guide? You could just ask a machine shop to replace the guide for you valve will come out with it.

On my 63 heads, I used an air hammer to remove the valve guides. On the install, I bathed the guides in dry ice and acetone (thermal shrinking). Wearing protection within seconds took the guide home with an air hammer. I did make on a lathe a set of custom tools for this bit: stop for correct depth first shot, chisel valve guide.

If you drill holes and thread dowels in the center, you can remove and install them over and over again. Once the dowels are out you can block sand out imperfections in your surfaces so there is less risk of poor sealing. I think the black sealant you referring to is called "Right Stuff(Permatex)."


If you brush some naval jelly (phosphoric acid) on those rusty surfaces (Rembrandt and let sit for minimum 1 hour), it will chemically change that rust or etch the metal for further corrosion protection. Neutralize the phosphoric acid with distilled water or soapy tap water, clean up with alcohol.
 
Last edited:
I was thinking that on the heads, if you have a seized valve broken inside of it, why don't you remove the valve guide? You could just ask a machine shop to replace the guide for you valve will come out with it.

On my 63 heads, I used an air hammer to remove the valve guides. On the install, I bathed the guides in dry ice and acetone (thermal shrinking). Wearing protection within seconds took the guide home with an air hammer. I did make on a lathe a set of custom tools for this bit: stop for correct depth first shot, chisel valve guide.

If you drill holes and thread dowels in the center, you can remove and install them over and over again. Once the dowels are out you can block sand out imperfections in your surfaces so there is less risk of poor sealing. I think the black sealant you referring to is called "Right Stuff(Permatex)."


If you brush some naval jelly (phosphoric acid) on those rusty surfaces (Rembrandt and let sit for minimum 1 hour), it will chemically change that rust or etch the metal for further corrosion protection. Neutralize the phosphoric acid with distilled water or soapy tap water, clean up with alcohol

That's great info GL03 - unfortunately, there is no way I could do what you did. I have neither the skills nor tools to do that. I did disassemble the 58 heads and they are too far gone to be more than a boat anchor. I do however, have the pair of heads from this 59 engine I'm working on. I removed them around Christmas time when I was off for a few days and they appear to be in okay condition but I'll check them out to see if they need to be lapped.

The black adhesive is 3M weather strip adhesive - very thin and gets tacky quickly. Looked at the Centerville website and they recommended it on one of the tech articles. Seemed to work pretty well.

I am VERY interested in trying the naval jelly on the metal - that seems really cool. I've learned all about electrolysis when I restored my Dad's old RX-7 about 5 years ago, so I'm all for learning innovative ways to restore stuff - thanks for the idea!
 
Back
Top