"Buick Trademark(s) used with the written permission of General Motors"

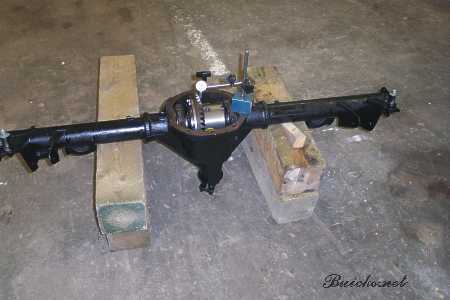
The easiest way to do put a posi in is to accept the fact that you are going to drop the 3rd member out of the car. I know some people do it in the car, but for the amount of extra effort it just works better on the ground. Make sure the car is well blocked so that when you need to reef on something it is solid! I always like to block in two places, either of which will adequately support the car. After blocking the car, drain the oil.
Set the diff. on a few blocks so that it has enough clearance to roll over without it rolling off the blocks. I would suggest the blocks should be 6"w x 12"h x18" for good stability.
 If you are reusing your gears, before disassembly, CHECK YOUR BACKLASH!!! You will be attempting to match it if you are reusing your gears like I am.
In this case I am not changing the gears, so there is no need to set the pinion depth. You will probably buy an install kit with the posi. It will include carrier bearings and pinion bearings along with a shim set and pattern paint.
Once you have measured you backlash, you can completely disassemble the rear end. After removing the carrier, I put the cover back on with a couple of bolts, so when I tap out the pinion, it only falls into the housing. When you pull the pinion bearing take note of the shims, you will be reusing them exactly as they are. The car wash is a good spot to wash it up inside and out.
My rear end suffered from poor venting! The side with the vent cap was in good condition, but the side without had a lot of rust build up and the axle had determinate. Part of the reason for this is the relatively low oil level in the housing. I decided to reiterated a second vent on the drivers side to avoid this.
The first step is to reinstall the pinion. Tap in the new races, press the first bearing with shims, onto the pinion followed by the crush sleeve. Place a few drops of oil on both races and turn the bearings in them. Place the pinion into the carrier and start the front bearing on to the pinion. Do not reinstall the seal at this time. Once you can start the pinion nut, start to draw down the yoke onto the bearing. An air wrench works well for this. When contact with the crush sleeve is made, progress will fall off. Stop using the air wrench at this time. Using a large wrench, such as a pipe wrench with a snipe to hold the yoke while you start pulling the yoke nut down. You will need a snipe for this wrench too! It just takes raw power. When you get close to zero tolerance, you must slow the progress to a minimum so that you do not over tighten the crush sleeve.
Here you will start using the inch pound wrench to check the pre load on the pinion. It should be 12 to 15 inch pounds for new bearings. 6 to 7 inch pounds for used bearings. Only tighten the nut enough to think you have moved it and recheck the pre load. It is really easy to overload the bearings.
Install the ring gear onto the posi. Use a bit of red loctite on the bolts and torque them to 65 - 70 lbs. Now your going to start to fit the posi carrier into the housing for the first time. Oil the housing ends and prepare to slip the carrier into place. For the first locative, use try the original shim set, or one of similar thickness. You will need to tap it, use a brass drift. You may want to put the bearing caps over the bearing assemblies and tap on them to seat, and torque the caps to 60 lbs. You can now make the first backlash measurement. If you are reinstalling you old gears, you are going to be working toward the original backlash. You did measure it didn't you? You will also measure the pre load. With new bearings, you will want 35 to 40 inch lbs. or 20 to 25 with used bearings. Once you have the carrier backlash and pre load. set, you can install the pinion seal.
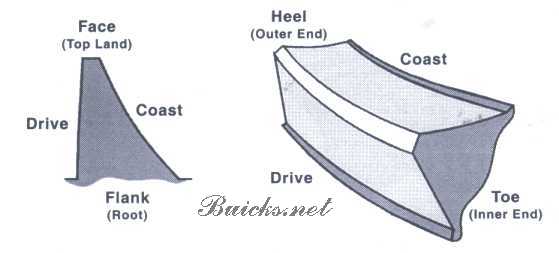
To properly set up the dial indicator mount if firmly to the housing so that it contacts the heel of a ring gear tooth as pictured.  When measuring backlash, do it in several places equidistant around the ring gear. They should all be within .001". If the error is more than this, you will need to find the problem, usually dirt or uneven torque.
To change the backlash .002" move .002" from one side to the other.

 In my case, the job didn't go so well...:(
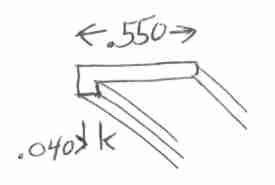
When I disassembled my case, I found that the '67 GS400 used a rear end common to the '66-'68 station wagon. It was designed to use a larger RW507-GS bearing. I found that if you find this bearing they would probably cost you $100.00 I decided this rear end wasn't going to get them. (I was fortunate in that one of our guys offered me one that he happened to have, thanks again bobc455!!!) As mentioned before, lack of air circulation in the drivers side tube had caused significant pitting in the axle, so it didn't look so nice. After looking at the problem, I decide to build some bushings to allow the use of the standard RW507-CR bearings. I used a relatively heavy press fit and set them in some red loctite. The bushing was 2.570" ID and 2.892" OD. It was .550" inch wide with a .040" lip as shown in the image.
I also decided to use a set of Moser axles supplied by Freddie Byars, 'big gear head' on the web board. I was very happy to have decided to put them in. The most obvious problems with OE axles are the poor castings. If you ever spin them in a lathe, you might wonder why they don't shake you right off the road! The next most obvious is they neck them down just past the splines causing an obvious week spot. Neither of these problem exist on the Moser axles.
Another consideration that many will have is the performance aspect of 10 bolt vs 12 bolt. I will be working on increasing the performance of my car, so a 12 bolt was considered, and for now and probably the future was dropped. Factors in the decision were, I will not be going for more than the 235/60 radials. This means no matter how much power I have, traction will limit the amount of abuse the rear member will take. The 10 bolt is lighter with lower rotating mass, conserving power. While I may do the odd "burn out", it should take it quite nicely. Remember too, the biggest cause of rear member failure is component wear and loose tolerances. Having said this, if I could have located a suitable 12 bolt that is almost certainly what I would have put in...![]()
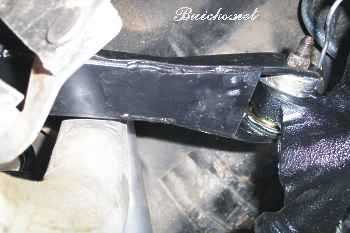
While I had the rear end out, I boxed the upper control arms and installed the poly bushings. Now it has a pretty solid connection with the car. The picture I took of the arms before installation was terrible, so this is what you get...
Here's one other trick I like to do to all rears I take the cover off. I take a flat 1" magnet that you get from your local hardware and fix it to the inside cover. I locate a spot away from the ring gear or any other possible area of low clearance, then scare the surface with some 40 grit. Mix up some JB weld and place a bit on the diff cover and squeeze the magnet into it. While many just use a magnetic plug, this is much more powerful. Actually, I put them in many things I take apart, including automatic trans. pans. These magnets will hold lots of big pieces, I found that out when I lunched a 4-speed I had placed on in. I was impressed with the amount of damage that was not in it!