Buick 350 HEAD PORTING
Musclecar Enthusiast has been defunct for several years now, rights seem to have been purchased by Cars and Parts @ https://www.carsandparts.com/
Musclecar Enthusiast March 2006
The Port Authority / Waking up the Buick 350 through cylinder head porting
Text and Photography by Jefferson Bryant / interview of Jim Burek
Pg 50
When the name Buick comes up in any bench-racing session, the conversation turns to 455 big blocks, Stage 1s and the venerable GSX. What rarely gets mentioned is the small block 350. Constantly overshadowed by the other GM small blocks, the Buick 350 lacks the aftermarket support it truly deserves.
This creates a problem for those who want to keep their 350 and not perform the common 455 swap. Sure, a basic small block rebuild can be had for fairly cheap, but what about making power? They are called musclecars after all, and the stock 260-280 hp leaves a little to be desired. But the small block Buick has quite a bit of potential. Supercharged 1,000 hp Buick 350s have been built proving the block can handle serious power; the trick is getting it out.
Back in the late '60s, Buick's engineers knew a thing or two about head design. The Buick 350 head features a tall, skinny intake runner, which yields excellent port velocity. Higher port velocity allows the engine to breathe better, letting the builder run a larger carburetor, while maintaining big bottom-end torque.
In order to achieve real power, with bolt-on performance parts non-existent, real engine work must be brought into the mix. With such a well-designed, yet under-realized head, porting offers the quickest way to awaken a sleepy Buick. Beginning with the basic gasket port matching, a beginner can make some progress without risking too much. The next step requires the port to be completely ported and polished, bowls blended, and the guides reshaped to really open up the heads.
Porting a cylinder head is a mix of art and science. Understanding the characteristics of airflow while maintaining the integrity of the head takes time to learn. An intimidating task for the novice, the guidance of a seasoned engine builder can unlock the mysteries of head porting.
One such person is Jim Burek, of Performance Automotive Engines, a high-performance Buick specialist. PAE has been in business since 1988, specializing in building all things Buick, from V-6s to an all new aluminum 455. Jim has made a career of building the better Buick. Poston Enterprises, which specializes in supplying quality Buick engine parts, supplied a set of swirl-polished stainless steel valves, valve springs, keepers, seals and an aluminum S-Divider intake, which will be port matched to the iron heads for the Buick 350 project.
With the heads off the 1971 Buick GS 350, Jim took possession of the vintage iron and transformed them into what will become a central part of our 400 hp small block Buick build-up that will surely turn some, uh, heads.
Pg 51
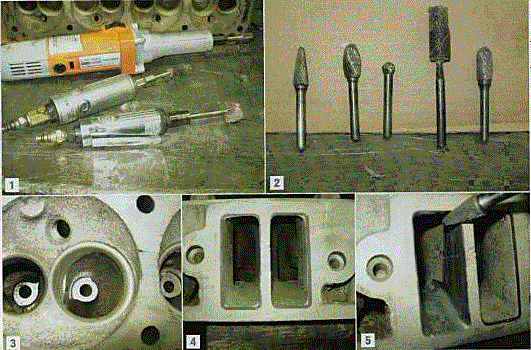
1 - The basic tools needed to port a head are air-powered die-grinders and an electric die grinder with a foot control for precise cutting.
2 - An assortment of fine carbide burrs assist in getting the most out of your iron. Head porting kits can be purchased from most mail order parts warehouses and include all the tips and sanding rolls needed. Do not use coarse tips on cast iron.
3 - The stock bowls and valve guides can certainly use some work here. A lot of iron can be removed to open up the flow.
4 - Use a sharpie to trace the outline of the intake gasket for use as a guide for port matching the intake runners.
5 - After trimming the walls of the intake port to the lines, the cone burr works well for removing the material in corner.
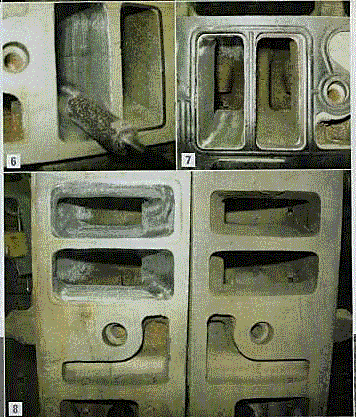
6 - After completing the carbide work, a sanding roll finishes up the job of smoothing the walls.
7 - The gasket is put on the head again to verify the porting. Each intake was widened by 0.100 inch.
8 - In comparison to a stock head, at right, the difference is quite amazing.
Pg 52
9 - The exhaust bowl work begins by laying back the short turn in the bowl. This step is crucial for proper flow.
10 - The valve guides are reshaped using the electric grinder, controlling the speed with the foot control. Clean up the guide until the iron is blended smooth to the opening. Use a 0.500" tip for the intake and a 0.375" tip for the exhaust bowls.
11 - A flap disc yields a smooth, round finish inside the bowl.
12 - When completed, the intake and exhaust bowls should look like this. Note the radical reshaping of the valve guides.
13 - The exhaust throat was enlarged by 0.100 inch.
14 - A round ball stone is perfect for smoothing the short-turn radius on both the intake and exhaust bowls.
15 - The stock exhaust runner before any work has been done.
16 - Here is the completed exhaust port. Notice the shape of the guide and the lack of flashing and pitting. This helps the exhaust flow and reduces turbulence.
Pg 53
17 - Polishing the combustion chamber reduces detonation by eliminating the hot spots. A series of sanding rolls accomplishes this task.
18 - The head is set up on the Sunnen machine to cut the competition 3-angle valve job.
19 - The swirl polished stainless steel valves feature a 30 degree back cut. While the stock valve sizes ( 1.88 inch intake, 1.55 inch exhaust ) are used here, larger valves can be used to increase flow even more for extreme high-performance engines.
20 - Compare the completed head with the stock head. Fact: the nickel content of Buick heads eliminates the need for hardened valve seats.
Pg 54
21 - Several times during the porting process, the flow bench is used to check the progress of the job. The final numbers are impressive, gaining 25 percent more flow than the stock head.
22 - Along with the heads, a Poston Enterprises S-Divider Buick 350 aluminum intake gets port matched to the heads. Tip: repeatedly dip the coarse carbide tip in ATF fluid to keep chips from clogging the bit. Only use the coarse tip in aluminum, not on cast iron.
23 - Like the head, the gasket is placed on the intake and marked with a sharpie. Begin the work by creating a steep angle to the guidelines. The trick here is to be careful and use light pressure. Do not go beyond the lines; if the intake runners are larger than the head runners, flow will be decreased because of turbulence.
24 - Keeping the tool parallel with the runner, blend the initial cuts to the rest of the port.
25 - Finish up the intake runner with a sanding roll to smooth out the rough cuts and remove the bumps and create a finished surface.
26 - Compare the completed intake port with the uncut port. Jim Burek, who supplied his handiwork here on these heads, designed the Poston S-Divider in the late 1980s.
FLOW BENCH NUMBERS As with any performance modifications, the project isn't finished until the numbers are in. After all was said and done, a 25 percent increase was found in both the intake and exhaust flow. Keep in mind, these heads are using the stock sized valves - even more increases can be found by enlarging the valves. By picking up 50 cfm over the stock head, these heads are capable of producing 480 hp. A key element to utilizing ported heads is selecting the right cam. The increased flow at 0.500 inch lift would require a cam capable of that much lift. For this engine, a Poston Enterprises GS#%)-112 cam with 0.510 inch intake and 0.518 inch exhaust lift will be used to take advantage of the extensive port work.
| Valve Lift |
Stk IN CFM |
Stk EX CFM |
Port IN CFM |
Port EX CFM |
| .100 |
66 |
44 |
74 |
55 |
| .200 |
119 |
93 |
135 |
110 |
| .300 |
169 |
124 |
187 |
145 |
| .400 |
198 |
128 |
241 |
167 |
| .500 |
198 |
130 |
243 |
176 |
| .550 |
n/a |
n/a |
251 |
178 |
| .600 |
n/a |
n/a |
254 |
181 |
Sources
POSTON ENTERPRISES
200 Ewing Lane
Atmore, AL 36502
( 800 ) 635-9781
www.PostonBuick.com
PERFORMANCE AUTOMOTIVE ENGINES
4401 Turf Road, Bldg E
El Paso, TX 79938
( 915 ) 855-6009
www.PAEenterprises.com
|