"Buick Trademark(s) used with the written permission of General Motors"

Templates for accurate cutting and drilling., by Brian Martin
Making templates is something that a lot of guys have a hard time doing. It is not that it is hard to do, it’s that we hate to “waste” time. Let me tell you right now, making templates SAVES time. You can quickly make them while installing emblems, patch panels, quarters, roofs, floors, and more. Anywhere you would splice, drill holes, or even painting graphics or stripes. With a template you can copy dimensions off the old part, the new part, or even another car you have access to. You can then transfer these dimensions to the car you are working on. The need for a template comes into play when you are working with an odd shaped part in particular. Is easy to mark something like a ½ pipe. You just measure the length with your tape or ruler, mark it and cut it. It is not that easy to measure and mark something like a roof post or fender. I may have over simplified the process a little in my drawings but it really is this easy.
Now, this is not a “Basics” on quarter panel or roof replacement. You wouldn’t necessarily splice a quarter or roof this way, though you could, this is just not that “Basics”.
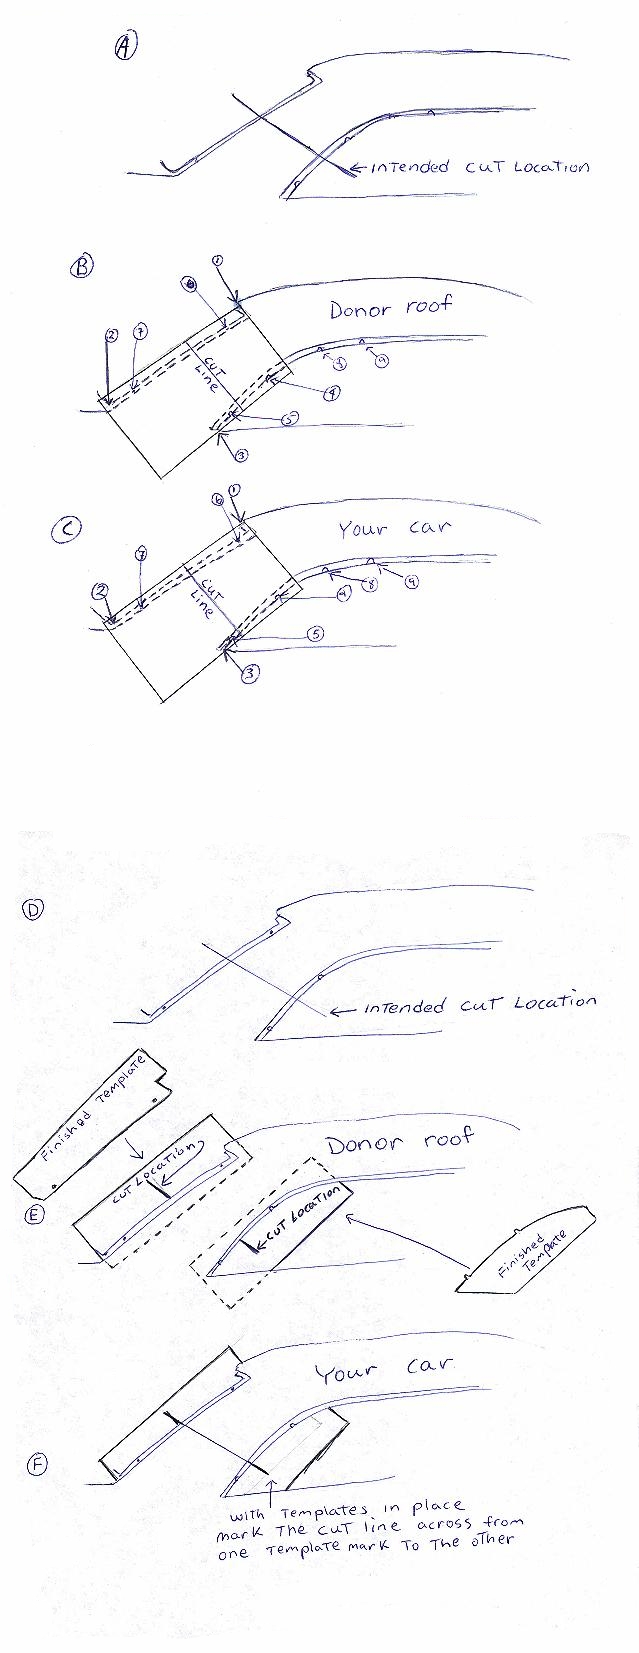
Figures A and D are the starting points on cutting off and replacing this roof or for that matter the quarter. You’ll need to find a place to cut it, then transfer this information to the new part. You could of course make the template off the new part and then transfer the information to the your car. By doing this you will cut off the old part and be able to set the new part right up on the car and it should fit perfect or near perfect.
These drawings show two different ways to use and make templates in body repair. There are other ways to make templates, these are just two of them and of course this roof post is just one of the many, many places you can use a template.
Figures A, B, and C show using a thin paper template over the pillar. Figures D, E, and F show using a cardboard or poster board to make a template along the edge of the pillar. I use the paper method about 90% of the time. The cardboard or poster board technique is good for things like locating a heavy angular item like a frame cross-member.
I have found that 3M welding shield paper (part number 05916) works well for the templates. It is flexible yet stiff enough. And the best part is it has a mild adhesive on the back to hold the template in place while making it and while transferring the information to the other part. The glue is sort of like a “Sticky note” and the template is easily removed and reapplied without tearing the paper or leaving any glue behind, it really works well. You want to apply whatever paper you use like a sheet of contact paper. You want it to “hug” the lines on the metal like a sticker would, with out air bubbles even. An air bubble wouldn’t make a bit of difference, but just so you have a good idea of that I mean, it should fit like a tight glove over the part. The closer it is to the actual shape of the part the closer it will be to the OTHER part where you will be putting it to transfer your information. Now, I know what you are thinking. The paper will change shape as you pull it up off the first part right? Yes it will, but if you have press it down tight and marked it with your “control points” it can easily be removed and reapplied to the other part perfectly straight. “Control points” (numbers 1 thru 9 in the drawings) are points of reference that can be found in exactly the same place on both the new and old parts. These control points can be mounting holes, sharp folds, sharp edges, some panels even have notches that line up parts for assembly. If you make your template using these control points, then transfer your template using them to the other part, you can be assured it will be perfectly aligned. You now transfer the cut lines, holes or what ever to the other part. One very important thing about these control points is you have to be sure they are EXACTLY the same from one part to the other. You can do this with a measuring tape and/or another template. As an example look at the B or C drawing. If you were to measure or make a template that included number 4, 8, and 9 then you could go to the other part and ensure they were the same. Now, you could with confidence use the number 4 as I did in the drawing. You need to REALLY be sure they are the same from on part to another because if you use something that is not the same from one to the other, you template will mean nothing. The control points number 1, 2 and three are a little different in that it really doesn’t matter if they are off a little tiny bit from one part to the other because you KNOW they are at least close enough to work, I mean they did, right? You are not always going to use some thing like numbers 1, 2 or 3. In fact, you hardly will. Most control points will be like the others in the drawings.
In the figures E and F you will see that the cardboard or poster board is held behind the panels and then you just run your pen or pencil along the edge to mark it. You can cut the template as I did in the drawing E. Or you could just mark it and then hold the template next to the other part and line up the marks as you made them on the first part. Then you could make a little mark on the part where the cut line will be and then draw a line across the part to meet the other mark. By the way if you are going to use anything like masking tape to mark for cuts, be sure to mark the side of the tape you will be cutting on with arrows or something. If you think that I have never cut on the wrong side, you would be wrong. I started marking the tape long ago, it doesn’t take me too many times cutting on the wrong side to learn that trick.
Just today I used the A, B, C method. I spliced a new quarter onto a VW Jetta. This template was for the rocker area. The old quarter was very badly damaged right at the front of the wheel well. And the new quarter was cut off right in the middle of the rear door jab in the rocker (on most late model cars the rocker, front hinge pillar, center hinge pillar on a four door, roof rail, and quarter are all on piece). I forgot to make a template before cutting the new quarter off the rest of the part. So now I had the back half of the rocker connected to the “dog leg” on the new quarter. And the same area on the old quarter was destroyed . This left me with a little harder template to make. I found that there as a holes along the bottom of the rocker that were the same on both parts. There was also a little notch on the top of the rocker where the door rubber went on. So that is all I needed. I laid the 3M welding shield paper over the new part so it hung off the end of the front where I had cut it off and it was hanging off the top and the bottom of the rocker right where it spot welds to the inner rocker. As I said, it was pressed down into the body lines TIGHT. I even pressed the paper as it runs down the edge of the metal almost cutting the paper. I pressed it down into the holes on the bottom and into the notches real good. Then I took a razor blade and cut off the excess paper on the top, bottom, and end. The other end of the paper ended right at the dog leg. The length at that point really doesn’t matter, as long as it includes a control point. Like in figure B, the paper above the number 1 control point and below the number 2 control point is doing nothing, so it could be a foot longer or an inch longer it really doesn’t matter. Mine ended right in front of the lower hole in the rocker and upper notch. I then carefully peeled it off the new part and stuck it onto the car lining up those control points. I pressed it down into the body lines just as it was on the new panel. The cut line was marked on the out side of the end of the template where I had cut the excess paper off when it was on the new quarter. This would ensure that the cut would be EXACTLY in the same place as the cut on the new quarter had. I removed the template, cut the rocker on the cut line, drilled out all the remaining spot welds and removed the rocker and quarter. I then trial fit the quarter and rocker and the rocker cut lined up perfect, providing me with a perfect door gap even. It really is that simple! The top of the roof post on this particular car was installed as it was from the factory with only a little splice in the jamb area. For that “template” I actually used a little piece I cut off the old quarter to mark the cut line on the new quarter, worked great.
Now the nagging on getting as much education as you can. I used these methods every once and a while. Then after almost 25 years in the business I went to an ICAR class (a nationally known training and testing group for auto body professional) and they drilled templates into us as being the RIGHT way to do it. I went back to work and started using them all the time. They really do save time, it is amazing how much time they save. No cutting and grinding, trial fitting over and over. I also find that template work great for reinstalling glue on emblems and moldings. Most cars these days have glue on emblems, no holes, just stick them on. So what I do is as I am taking them off, I run a strip of tape under them right along a body line. Then off the edge of the panel (this is usually on the deck lid where you find these glue on emblems) and mark it on the edge and on the tape where the emblem is located away from the edge of the lid with a “Sharpie” pen. I even write the word that is on the emblem and maybe a note if needed about location, left right, that sort of thing. I then peel this tape off the lid and stick it to the inside of the window on that side of the car. When the car is all done painting and back in my stall for re-assembly all I do is peel the tape off the inside of the rear window, stick it on the car where it was before and install the new emblems.
You could use them to record how high the fender sat compared to the rad support. You could record where the bumpers sit in relation to the body, the uses are endless. If you are pulling a car apart for a restoration, you know it will be apart for a LONG time. If you think for one minute that you will remember these little details you’re wrong. Make templates, mark them and store them. You will be very glad you did.
Brian Martin