"Buick Trademark(s) used with the written permission of General Motors"

Spray technique Basics, by Brian Martin
A perfect paint job would have a consistent thickness on every square inch of the car, agreed?
To have four coats on the left fender, two on the right, five on the left door and one on the right wouldn't be right. For consistent color, appearance, and durability you need the thickness (film build) to be consistent.
The closer to a perfect 'decal' over the car, the better. However, just by the nature of human beings and their faults this isn't always the case. If you were to check the 'MIL' thickness (there are super accurate digital tools for this) of the average repainted car you would find many different amounts of film build.
More film build is usually found at the meeting point of two panels, like the seam at the door and fender. Think about it, you can't paint down the whole side of the car in one pass, so you paint the fender with a number of passes of the gun starting at the front top, ending at the rear top, then moving down to the next pass right below that. You do this over and over until the fender is shot. Then you move on to the door, right? What happens right at the seam between the two? You have painted a coat on the fender, AND on the door; you can't start and stop perfectly at the seam, so right there at that seam you are applying twice the amount of paint. Yep, if you apply three coats on the car, you are applying SIX coats at those seams.
It is very easy in these days of high solids clears to see a sag running vertically right on the edge of these panels. It will almost look like the panel has a body line going down the folded edge. It is caused by too much film build. Many times this sag isn't repaired because it almost looks natural there on the edge. But it can be eliminated with a change in spray technique.
Ever seen a candy paint job that is darker at the seams? This was caused be the very thing I just described.
A classic example of this can be found on many early VW bugs. The hood is triangle shaped, with the front right at the handle being much narrower than the rear. Well, if you paint one side of the hood and then move to the other side it is VERY easy to end up with twice the coats right down at front of the hood. Go look at that point the next time you see an old air cooled bug and you will likely see a sag in the paint right at the bottom of the body line next to the handle.
Understand, this isn't the end of the world. Most of the time this small discrepancy is acceptable. My point is, the closer to perfect, the better.
I was taught this simple spray technique about a hundred years ago (seems like that) at one of my first jobs. We were shooting lacquer completes. Sometimes these paint jobs had fifteen or twenty coats of color applied. My mentor at the shop pointed out to me to 'Move the dry spot around'. If you didn't you would end up with a much drier area at each of these seams. Remember, this was lacquer, if you have not shot it, it dried FAST. The over spray off the end of the spray pattern could produce a LOT of dryness. So if you did this coat after coat it would build up pretty bad.
After shooting a zillion coats of lacquer that way, I continued the practice. I have used this technique all these years with primers, sealers, colors, and clears, urethanes, epoxies, enamels, all with great success. It just makes sense to me to try to get that perfect 'decal' over the panels. I pay particular attention to doing this when I do edges, there is one pet peeve of mine, one thing that boils my blood is seeing fender edges under the wheel well with dry spots or worse yet, no paint! EVERY SINGLE SQUARE INCH of panel should have good coverage. I don't care if it is going to be hidden with a bumper, under a vinyl top, unseen after the fender or what ever is bolted on, I don't care, EVERY SINGLE SQUARE INCH gets covered, if it was intended to be so.
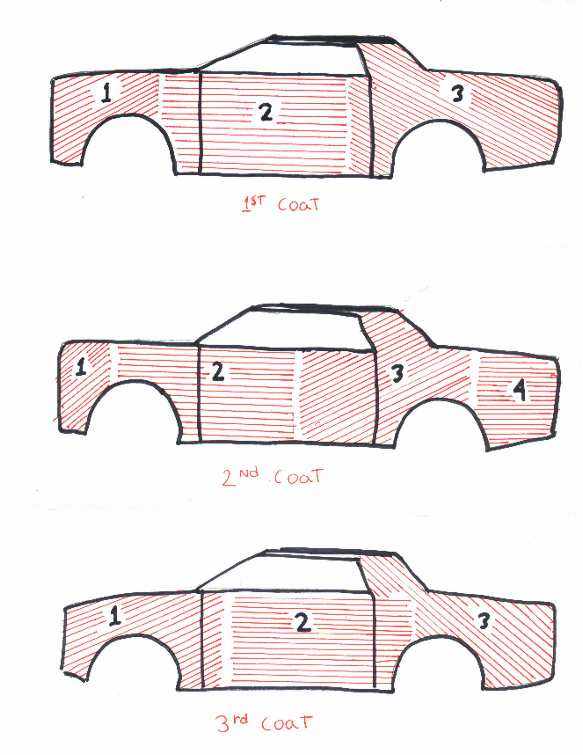
Here is an example of the technique. You don't have to do exactly as I have in the drawings, these are just suggestions. Adjust this concept to your particular needs. The basic point is to not start and stop at the same point every coat.
PLEASE NOTE: The direction of the lines in the drawing DO NOT mean you are to spray the paint in that angle, that was only done to more clearly show the starting and stopping points. To spray in this fashion isn't out of the question though; I will find myself doing that as well, to get a more even coat. But that is only in particular places with particular needs.
Brian Martin