Overdrive installation in my 39 Buick.

JimShelly

Member
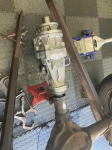
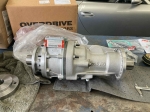
Last weekend was the start of my overdrive project. My boys got a little carried away, announcing at 8am Saturday they'd removed the rear end from the car and everything was ready for me. I had thought to do some careful measuring to see where I could put the overdrive before removing the torque tube, so this was the first 'Oh Well' of the weekend.
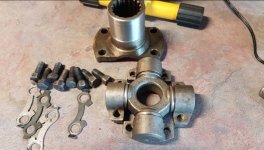
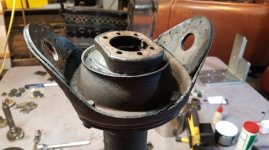
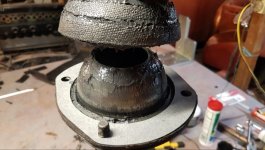
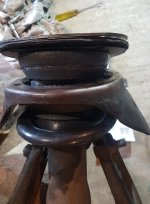
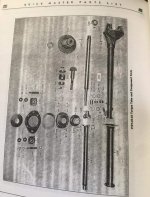
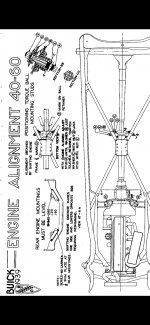
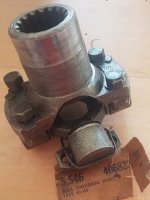
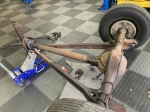
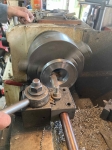
By the end of the day we'd taken a deep breath, cut the torque tube and inner driveshaft, patched a section of torque tube back on, moving us forward as the driveshaft was not hollow as far back as we needed. On Sunday we machined the couplers for the inner driveshaft and torque tube, then started welding. I thought I only had one small problem to solve Monday morning but when we went to roll the rear end under the car, it bound up. Fixing this took hours. It turned out the driveshaft section in front of the overdrive had some serious runout and bound up in the front bearing. We found the section of driveshaft between the overdrive and the torque ball had serious runout and was binding in the bearing as it turned. We managed to cut the weld and correct that, then put the rear axle back into the car by the end of the day so we could roll it out of the shop.
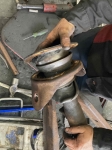
I didn't anticipate having to disassemble the torque ball section of the tube, but indeed we did. Now I need some further gaskets, the ball packing and the rear boot before I can finish reassembling. Does anyone know if there is a procedure for setting up the torque ball and all it's associated gasketing?
jns
 

Attachments

  • 39 Buick - 1 of 7 (1).jpeg
    39 Buick - 1 of 7 (1).jpeg
    561.4 KB · Views: 37
  • 39 Buick - 7 of 7 (1).jpeg
    39 Buick - 7 of 7 (1).jpeg
    578.2 KB · Views: 39
  • 39 Buick - 6 of 7 (1).jpeg
    39 Buick - 6 of 7 (1).jpeg
    667.8 KB · Views: 34
  • 39 Buick - 5 of 7 (1).jpeg
    39 Buick - 5 of 7 (1).jpeg
    574.6 KB · Views: 31
  • 39 Buick - 4 of 7 (1).jpeg
    39 Buick - 4 of 7 (1).jpeg
    639.1 KB · Views: 33
  • 39 Buick - 3 of 7 (1).jpeg
    39 Buick - 3 of 7 (1).jpeg
    552.7 KB · Views: 33
  • 39 Buick - 2 of 7 (1).jpeg
    39 Buick - 2 of 7 (1).jpeg
    535.7 KB · Views: 36
Hi. It's quite a process to sort out the torque ball. Getting replacement parts (seals, universal joint, torque ball) can be a challenge. Have recently done mine, there are pretty good instructions in the '39 work shop manual. Gaskets are available from Bob's. Would love to do overdrive on my car just don't have the facilities to do it unfortunately. Would be good to hear how it goes once done.
 

Attachments

  • Screenshot_20211107-063630_Gallery.jpg
    Screenshot_20211107-063630_Gallery.jpg
    119.1 KB · Views: 11
  • Screenshot_20211107-063620_Gallery.jpg
    Screenshot_20211107-063620_Gallery.jpg
    93.5 KB · Views: 9
  • Screenshot_20211107-063616_Gallery.jpg
    Screenshot_20211107-063616_Gallery.jpg
    107.8 KB · Views: 8
  • Screenshot_20211107-063553_Gallery.jpg
    Screenshot_20211107-063553_Gallery.jpg
    174 KB · Views: 7
  • Screenshot_20211107-063638_Gallery.jpg
    Screenshot_20211107-063638_Gallery.jpg
    113.7 KB · Views: 8
  • Screenshot_20211107-063810_Gallery.jpg
    Screenshot_20211107-063810_Gallery.jpg
    218.5 KB · Views: 9
  • Screenshot_20211107-063836_Gallery.jpg
    Screenshot_20211107-063836_Gallery.jpg
    357.6 KB · Views: 9
  • Screenshot_20211107-063650_Gallery.jpg
    Screenshot_20211107-063650_Gallery.jpg
    165.2 KB · Views: 9
The Overdrive Install continues. In mid November, we spent 3 days getting everything to work. I’d had to order a re-vulcanized torque ball seat and shims so we’d never attempted to fully assemble the torque tube in our last session. When we did so, we found our front driveshaft was ½” too long to allow us to bolt the torque ball assembly together. So out came the front driveshaft to be shortened. After reassembly, we continued with the torque ball, and shimmed it to what seemed reasonable. I never got the shims set so the front of the tube fell slowly to the floor after support was withdrawn, but it did move easily. We also installed new torque mounts.

During this time we’d made a bronze bushing to replace the pilot bearing, pressed that into the crankshaft, and cleaned up the input shaft. We installed a new HD clutch disc and PP from a 94 Jeep Cherokee, a new TOB and put the transmission up into place, then hooked up the exhaust as I wanted to start the car to see what we had. The starter had not been catching reliably, but I always thought it was a problem with the 6v starter drive. Then Mike says, “What are you going to do about your flywheel?” Me “Why?” Mike: The leading edge is all chewed up. That’s why the starter doesn’t engage.” Me (very edited) “You could have said SOMETHING before we got to this point…”

Sure enough the ring gear was badly chewed all round. After a call to Bob’s and learning there was no extended throw starter Bendix, I realized we had to fix this now. At 4400 pounds, you don’t want to push start this car. Out came the transmission and we unbolted the flywheel. It wouldn't drop out of the bell housing, so we had to unbolt that and slide it back to gain enough clearance to take out the flywheel. We then heated the ring gear, dropped it off the flywheel, cleaned up the wheel and flipped it over. That put the unused side of the ring gear towards the starter. We reheated the ring gear until it slipped over the flywheel and went to lunch while it cooled. Problem solved. Reassembly was not solved. With the flywheel tilted back we’d gotten a wrench on the upper bell housing bolts to loosen them. Now we had to tighten them, a laborious process of turning them in a flat at a time. Done that, we bolted the flywheel to the crankshaft, re-installed the transmission and starter and started the car. I found the transmission shifted without problems and couldn’t feel any vibration so the pilot bushing seemed to be a success.

We put the rear end assembly under the car, mated the driveshaft to the tranny output spline and hooked up the torque mounts, springs, torsion bar, shock links, et al.

I wired up the overdrive switch while Mike fixed the rear brake line, we bled the system, and launched out on a test drive.

We have a lot of vibration through all speed ranges. There are probably a few things contributing to this.

Most certainly the driveshafts are out of balance. I have to research shim adjustments to the Torque Ball, centering the driveshaft with the new Torque Ball Mounts, and shimming the engine mounts. I’ve ordered a 39 Manual. The good news was we could feel the overdrive shifting in and out.

Try though we did, we never got the driveshafts welded true. Now that we know our driveshafts are the proper length and everything fits together, my plan is to return in January, drop the rear end, take the driveshafts to a Driveshaft Shop and have them remade/balanced. At the same point I’ll have researched centering the driveline and shimming the torque ball so I can set that up properly. Confidence is high that after we do all that, we’ll eliminate the vibration and have a car which cruises at 60mph with an engine RPM under 3500.
 
Did you ever finish this project?
I did Muley. I think I lost the strength to write about it. I ran the overdrive for a year, my transmission came apart in the 22 Great Race, and as part of the entire episode after that, I took out the overdrive, bought a 3.99 rear diff and torque tube, installed that, and made it through the 23 Great Race. BUT last fall, I was on a weekend rally and started having transmission problems again. I'm in the midst of trying to figure out what to do. Obviously, the tranny is a weak point. If you've ever taken it out you know it weighs 60 or 70 pounds and drives a 4000 pound car. Great Race makes one shift constantly and the tranny doesn't hold up. As I said, I'm trying to figure out if I can do the rally this year in the Buick or switch to another car... jns
 
Back
Top