The shop manual does not display a good exploded diagram of the horn assembly and as my car came mostly disassembled, I had to track down parts and instructions. When assembling the horn ring, it seems the ring assembly allows little to no movement of horn ring. There is supposed to be a soft rubber isolator between the horn ring and the contact plate. Mine is rock hard, so until I peruse the isles of the local hardware store for foam pipe insulation as a possible alternative, my horn ring is stiff. The soft rubber ring would be placed here in the dark spot in the center of the horn ring:

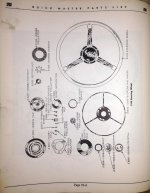
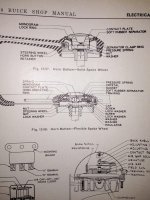
The assembly is shown in Section 13, Electrical as follows:
Greg led me to the diagram contained in the chassis parts book which is a bit more clear. The trim ring is removed from the steering wheel with three screws with lockwashers on the back of the trim ring.

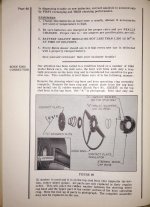
The back of the trim ring assembly looks like this:

The assembly, starting at the trim ring is: the wire spring, followed by the horn ring, the soft rubber separator, then the contact plate. Careful, the three stamped steel nuts holding the contact plate have two additional pieces used to isolate electrical connection between the trim ring and the horn contact at the steering column. The shouldered piece (right piece in photo) is inserted on the screw post before placing the contact plate. After the contact plate is placed, insert the washer (middle piece) then the stamped nut.

The spring had a thin coat of rubber, not for electrical isolation, but likely for vibration or rattle control. I used a length of heat shrink tube to serve that purpose.

The photos above were taken before the steering wheel and associated pastic parts were restored or replaced.
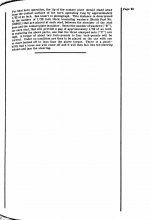
Before the horn ring assembly is attached to the steering wheel, amother very important piece of insulation is placed on the steering wheel hub:

Another problem that I encountered was dead spots on the horn ring. The contact plate should be spotless and the area shown by the tip of the screwdriver in the following photo needs to be absolutely clean as well.

Before I could test the horn I had to reconnect the battery. This moment incited abject fear as my left ear would be about a foot away from the horn on the firewall when I placed the lead back onto the battery. Prepare yourself with hearing protection! Here's the finished product. I might want to rechrome the trim ring, but for now a good polish will clean it up nicely.