I'm just getting this little project started and I thought I'd share it here so you can see it come together. If you have any tips for accuracy, they'd be greatly appreciated! Also, if you want to build a model of your Buick and like something you see me doing, please ask and I'll help you learn how to do it. Some model building techniques can also be useful for restoring plastic interior parts so maybe you'll find something you can use here.
I've been away from model building for a number of years but looking to get back into it. I recently had my optometrist set me up with a special pair of glasses to give me the proper depth of field in my vision to start doing these again because my eyes just aren't what they used to be. I have plans to do some of the more modern, more detailed kits but to get back into it I've decided to build a 1966 Wildcat that's been sitting unbuilt in my basement literally for decades. The kit originated in late 1964, when AMT made the dealer promotional model for the 1965 Wildcat. Back then model kits started as promos, then the model companies would modify the promo tooling to add an engine and custom parts so they could sell hobby retail model kits to maximize their profit on the tooling. Because the 1966 Wildcat was very similar to the '65, they didn't tool up a new promo and hobby kit for '66. Instead they just modified the '65 with a new grille, new side gill trim and the rear was changed. Unfortunately they didn't update the interior so this '66 kit still has a '65 interior. It does not have GS markings but it comes with a 425 Nailhead Super Wildcat 465 backed by a manual transmission. If my research is correct, that would be a 3-speed, right? So the kit is a bit of a disappointing oddball but I'm going to make the best of it. My detailing will be centered on the body and engine because the chassis lacks detail and the interior is just wrong.
Here's the box. This edition of the kit was released in the late 1980s.

Despite being in the "Customizing Series" all the parts for the stock version are included in the box.

I found this '66 Riviera years ago on sale really cheap. I bought it for parts since I'm not into low riders. Because it's a more modern kit it has more detailed parts. It will be a parts donor to improve upon the '60s parts in the Wildcat kit.

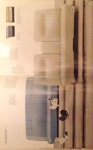
Looking inside the Wildcat's box, here's the body and the chassis plate. The body looks good but the chassis lacks front suspension detail and all the parts like the rear suspension and exhaust system are just lumps molded in one piece. It also has two holes at the front and two more at the rear for screws to attach the chassis to the body. That really kills the realism. Because no one makes a suitable chassis in another model kit to replace this one, I'll just be giving this one some simple paint details. My goal isn't for a show-winner but for a finished model that looks good sitting on its wheels.


If you haven't built a model kit in over thirty years, here's how things have changed. The single piece of white plastic on the left is the Wildcat's chassis, which was originally tooled by AMT in late 1964. The two metal axles below it are what mounts the wheels. All the grey plastic parts to the right of it are the pieces that make up the chassis of the Riviera. Not only are all the parts separate and well-detailed, even the floorpan is separate from the frame. If you flip that floorpan over, that's the interior floor of the Riv. It doesn't have a "bucket" like models from the '60s. Also there are no more screws wrecking the look of the chassis. It's just too bad that it's the wrong chassis to underpin the Wildcat because it would be a nice upgrade from the toy-like chassis it has.

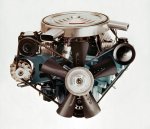
The biggest modification that I'll be doing to upgrade the look of the Wildcat is the top of the radiator core support. The Wildcat has a pair of cylindrical lumps molded into the core support that make the engine compartment look toy-like. I'll be removing those lumps and cutting down the top of the support so I can remove the top of the support from the Riv's body and install it in the Wildcat. The fan guard on the Riv isn't exactly right for the Wildcat but it's closer than the plain white radiator wall molded to the Wildcat body. I'll look at photos and see if I can modify it to get it to look closer. The Wildcat's firewall looks okay to me but it completely lacks a master cylinder. The Riv has a nice two-piece assembly of the master cylinder and power booster that will find a new home in the Wildcat.

As much as I'd like to steal the engine block and Super Turbine 400 from the Riv, keeping the metal axle chassis dictates keeping the old '60s block with the big hole in it. The hole won't be visible when the model is together.

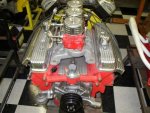
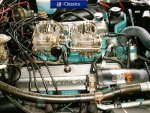
I will, however, grab the whole top end of the Riv's engine. The heads, intake, carburetors, air cleaner, valve covers and exhaust manifolds are all vastly superior to the original Wildcat parts. The Riv parts are grey and the Wildcat parts are white. I'll be keeping the original Wildcat water pump/timing chain cover and accessory drive because it has the correct brackets for the alternator and power steering pump. Comparing the fans, both have decent detail but the Wildcat has five blades while the Riv has six. Which one is correct?

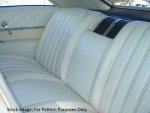
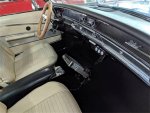
Here's the most annoying thing about this: the '65 interior. It's very disappointing that AMT didn't update this but I guess they didn't want to spend the money. Luckily this isn't a convertible so it won't be very visible. Rather than getting bogged down attempting to correct this, I'll just approach it like a '65 and make it the best '65 interior I can with what AMT has given me.


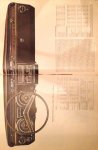
The chrome details look nice as you can see in these close-ups.


Now the tough decisions. If there's anyone out there actually reading this, I'm open to suggestions or input. My preference is to do a dark color. I've narrowed my choices to Shadow Turquoise, Burgundy Mist, Midnight Blue or Regal Black. What interior colors came with these? The easiest would be to do a black interior but that's a bit boring so I'd prefer white. Did all the white interiors have black dashboards and carpet or were the dashes and carpets available in colors with white seats and door panels? Would it be correct to do Shadow Turquoise with a white/black interior? I think that's my front-runner.

I've been away from model building for a number of years but looking to get back into it. I recently had my optometrist set me up with a special pair of glasses to give me the proper depth of field in my vision to start doing these again because my eyes just aren't what they used to be. I have plans to do some of the more modern, more detailed kits but to get back into it I've decided to build a 1966 Wildcat that's been sitting unbuilt in my basement literally for decades. The kit originated in late 1964, when AMT made the dealer promotional model for the 1965 Wildcat. Back then model kits started as promos, then the model companies would modify the promo tooling to add an engine and custom parts so they could sell hobby retail model kits to maximize their profit on the tooling. Because the 1966 Wildcat was very similar to the '65, they didn't tool up a new promo and hobby kit for '66. Instead they just modified the '65 with a new grille, new side gill trim and the rear was changed. Unfortunately they didn't update the interior so this '66 kit still has a '65 interior. It does not have GS markings but it comes with a 425 Nailhead Super Wildcat 465 backed by a manual transmission. If my research is correct, that would be a 3-speed, right? So the kit is a bit of a disappointing oddball but I'm going to make the best of it. My detailing will be centered on the body and engine because the chassis lacks detail and the interior is just wrong.
Here's the box. This edition of the kit was released in the late 1980s.
Despite being in the "Customizing Series" all the parts for the stock version are included in the box.
I found this '66 Riviera years ago on sale really cheap. I bought it for parts since I'm not into low riders. Because it's a more modern kit it has more detailed parts. It will be a parts donor to improve upon the '60s parts in the Wildcat kit.
Looking inside the Wildcat's box, here's the body and the chassis plate. The body looks good but the chassis lacks front suspension detail and all the parts like the rear suspension and exhaust system are just lumps molded in one piece. It also has two holes at the front and two more at the rear for screws to attach the chassis to the body. That really kills the realism. Because no one makes a suitable chassis in another model kit to replace this one, I'll just be giving this one some simple paint details. My goal isn't for a show-winner but for a finished model that looks good sitting on its wheels.
If you haven't built a model kit in over thirty years, here's how things have changed. The single piece of white plastic on the left is the Wildcat's chassis, which was originally tooled by AMT in late 1964. The two metal axles below it are what mounts the wheels. All the grey plastic parts to the right of it are the pieces that make up the chassis of the Riviera. Not only are all the parts separate and well-detailed, even the floorpan is separate from the frame. If you flip that floorpan over, that's the interior floor of the Riv. It doesn't have a "bucket" like models from the '60s. Also there are no more screws wrecking the look of the chassis. It's just too bad that it's the wrong chassis to underpin the Wildcat because it would be a nice upgrade from the toy-like chassis it has.
The biggest modification that I'll be doing to upgrade the look of the Wildcat is the top of the radiator core support. The Wildcat has a pair of cylindrical lumps molded into the core support that make the engine compartment look toy-like. I'll be removing those lumps and cutting down the top of the support so I can remove the top of the support from the Riv's body and install it in the Wildcat. The fan guard on the Riv isn't exactly right for the Wildcat but it's closer than the plain white radiator wall molded to the Wildcat body. I'll look at photos and see if I can modify it to get it to look closer. The Wildcat's firewall looks okay to me but it completely lacks a master cylinder. The Riv has a nice two-piece assembly of the master cylinder and power booster that will find a new home in the Wildcat.
As much as I'd like to steal the engine block and Super Turbine 400 from the Riv, keeping the metal axle chassis dictates keeping the old '60s block with the big hole in it. The hole won't be visible when the model is together.
I will, however, grab the whole top end of the Riv's engine. The heads, intake, carburetors, air cleaner, valve covers and exhaust manifolds are all vastly superior to the original Wildcat parts. The Riv parts are grey and the Wildcat parts are white. I'll be keeping the original Wildcat water pump/timing chain cover and accessory drive because it has the correct brackets for the alternator and power steering pump. Comparing the fans, both have decent detail but the Wildcat has five blades while the Riv has six. Which one is correct?
Here's the most annoying thing about this: the '65 interior. It's very disappointing that AMT didn't update this but I guess they didn't want to spend the money. Luckily this isn't a convertible so it won't be very visible. Rather than getting bogged down attempting to correct this, I'll just approach it like a '65 and make it the best '65 interior I can with what AMT has given me.
The chrome details look nice as you can see in these close-ups.
Now the tough decisions. If there's anyone out there actually reading this, I'm open to suggestions or input. My preference is to do a dark color. I've narrowed my choices to Shadow Turquoise, Burgundy Mist, Midnight Blue or Regal Black. What interior colors came with these? The easiest would be to do a black interior but that's a bit boring so I'd prefer white. Did all the white interiors have black dashboards and carpet or were the dashes and carpets available in colors with white seats and door panels? Would it be correct to do Shadow Turquoise with a white/black interior? I think that's my front-runner.


") ) but this does fine for replicating the less-than-mirror-like chrome on factory underhood parts. The difference between the chrome and aluminum is a bit hard to see in this photo but you can see it in person.
) but this does fine for replicating the less-than-mirror-like chrome on factory underhood parts. The difference between the chrome and aluminum is a bit hard to see in this photo but you can see it in person.